Beginning with NAV 2015 and up until NAV 2017, we can only include 1 attachment in each email, therefore, this was never an issue.
However, beginning with NAV 2018, we can include up to 5 attachments. Unfortunately, the Email Dialog was not updated, thus we
continue to see only 1. The bad part about this is that we can potentially send up to 4 more additional attachments, without
realizing it, if we opted to send it immediately, without checking the "Edit in Outlook" option.
Description
In this tutorial, I will show you how to update page 9700 Email Dialog, so it can show the additional attachments.
Identifying the Problem
Our problem is that the Email Dialog is only showing 1 attachment, when could be showing up to 5, so let's start by performing an operation that
we can expect the Email Dialog to show multiple attachments. By the time we finish this tutorial, this same operation can be used to verify, whether
or not, this problem has been corrected.
Download our fix for Free!
Until there is an update that patches this issue, for customers who want to apply an early fix, but don't have the object modification license, you
may download this FOB file, and import it at your own discretion. This fix applies to NAV 2018 only, not the earlier versions, nor will it enable
earlier versions to be able to include more than 1 attachment per email.
NOTE: Before importing this file, always make a backup of your existing objects!
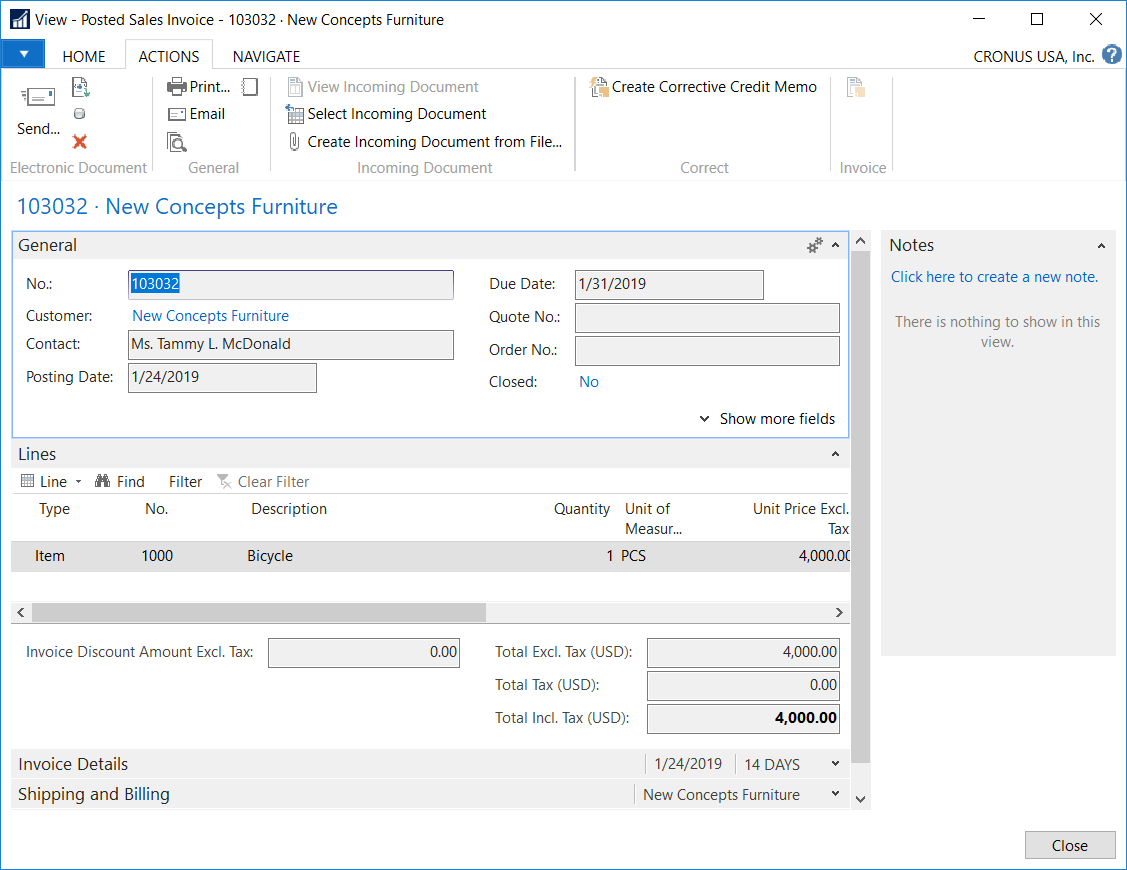
Step 1. Open a Posted Sales Invoice to send an Email from.
In order to create a sample email that has multiple attachments, we'll use NAV's built-in feature for including, Incoming Documents,
as an additional attachment to the invoice itself, when emailing. If the invoice already has an Incoming Document associated, then we can skip to step 3.
Zoom In
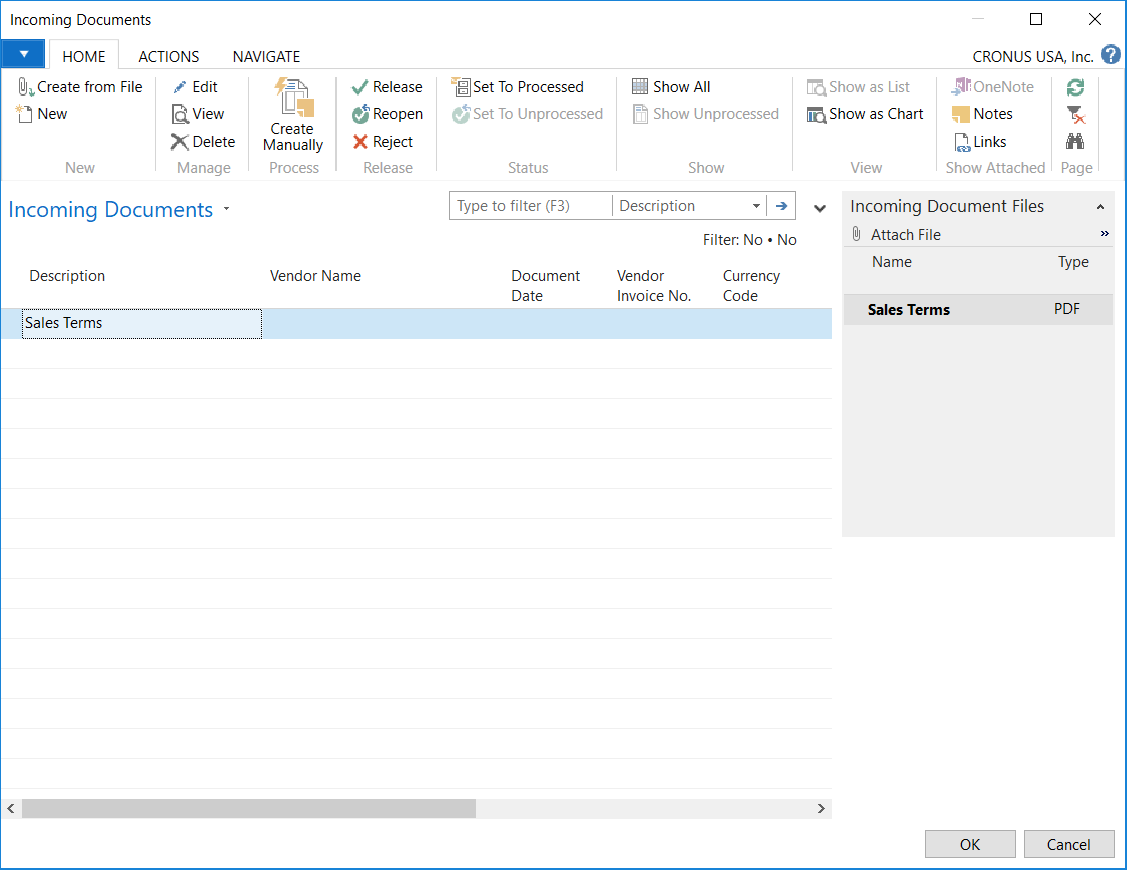
Step 2. Attach a sample, Incoming Document.
You can use the Select Incoming Document or Create Incoming Document from File..., from the ACTIONS tab of the Posted Sales Invoice to do this.
We just need to attach something so it can force an additional attachment to appear, when sending an email.
Zoom In
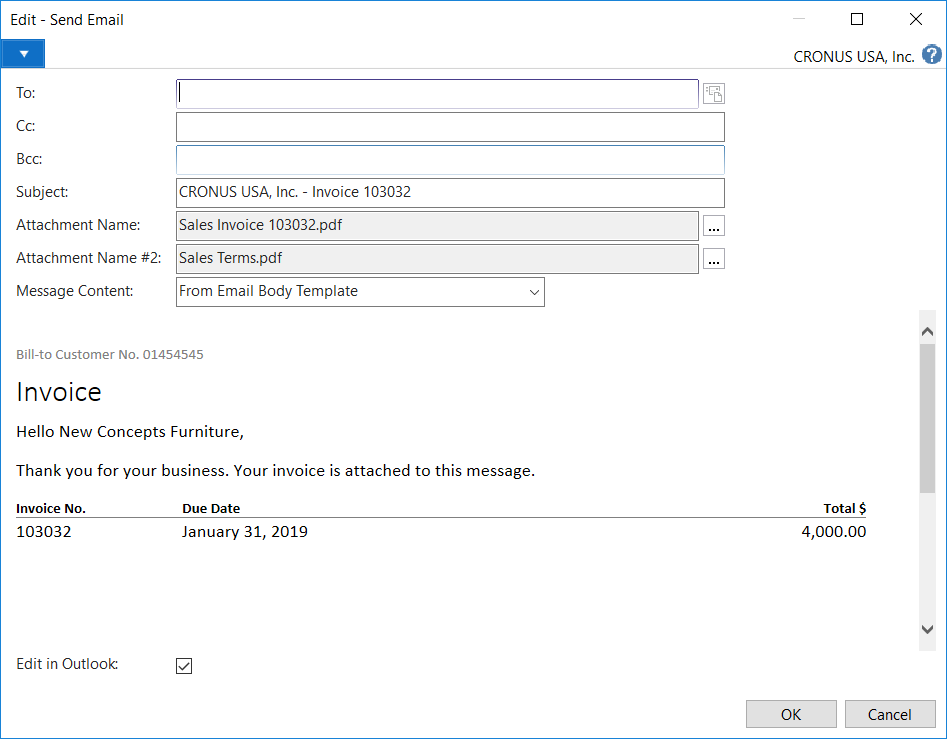
Step 3. Email the document.
Click on the Email menu item from the ACTIONS tab on the Posted Sales Invoice. NAV will take a few seconds to create the invoice as an attachment,
then look for and include the Incoming Document as an additional attachment, if it exists. As you can see here, there is only 1 attachment, but
we should see 2.

Zoom In
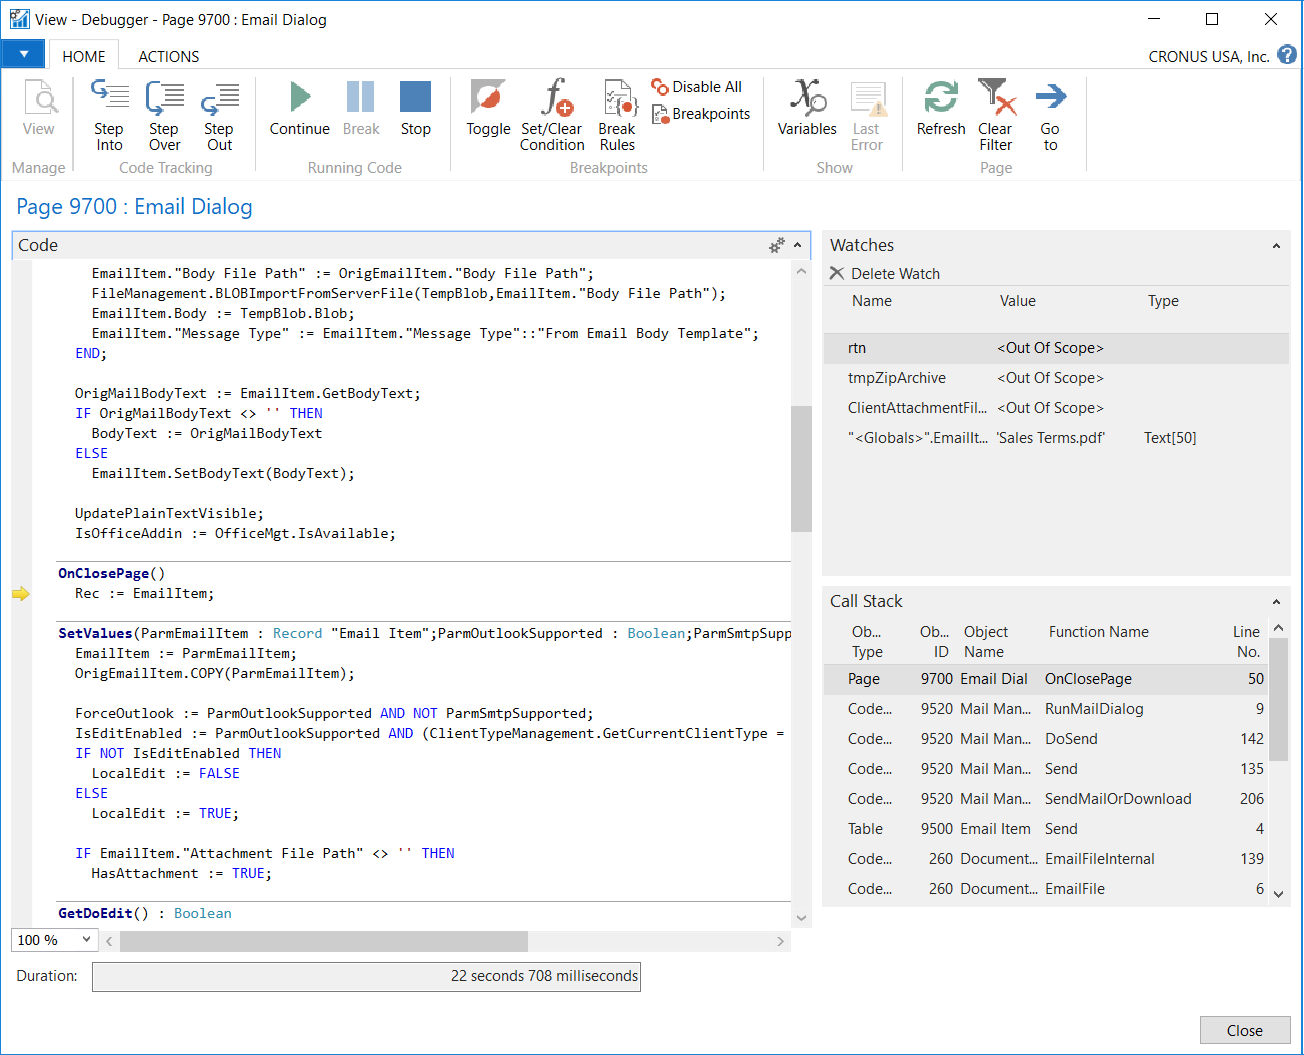
Step 4. Open a Debugger window.
If you already know which page to look for, you can skip this step.
Attach a debugger to the NAV session that you have opened then repeat step 3. After the Email Dialog opens, switch back to the debugger and click
Break. Once again, you'll need to switch back to the Email Dialog, and click OK to continue. This is when the debugger will actually kick in
and we will know exactly which page we need to update.
Zoom In
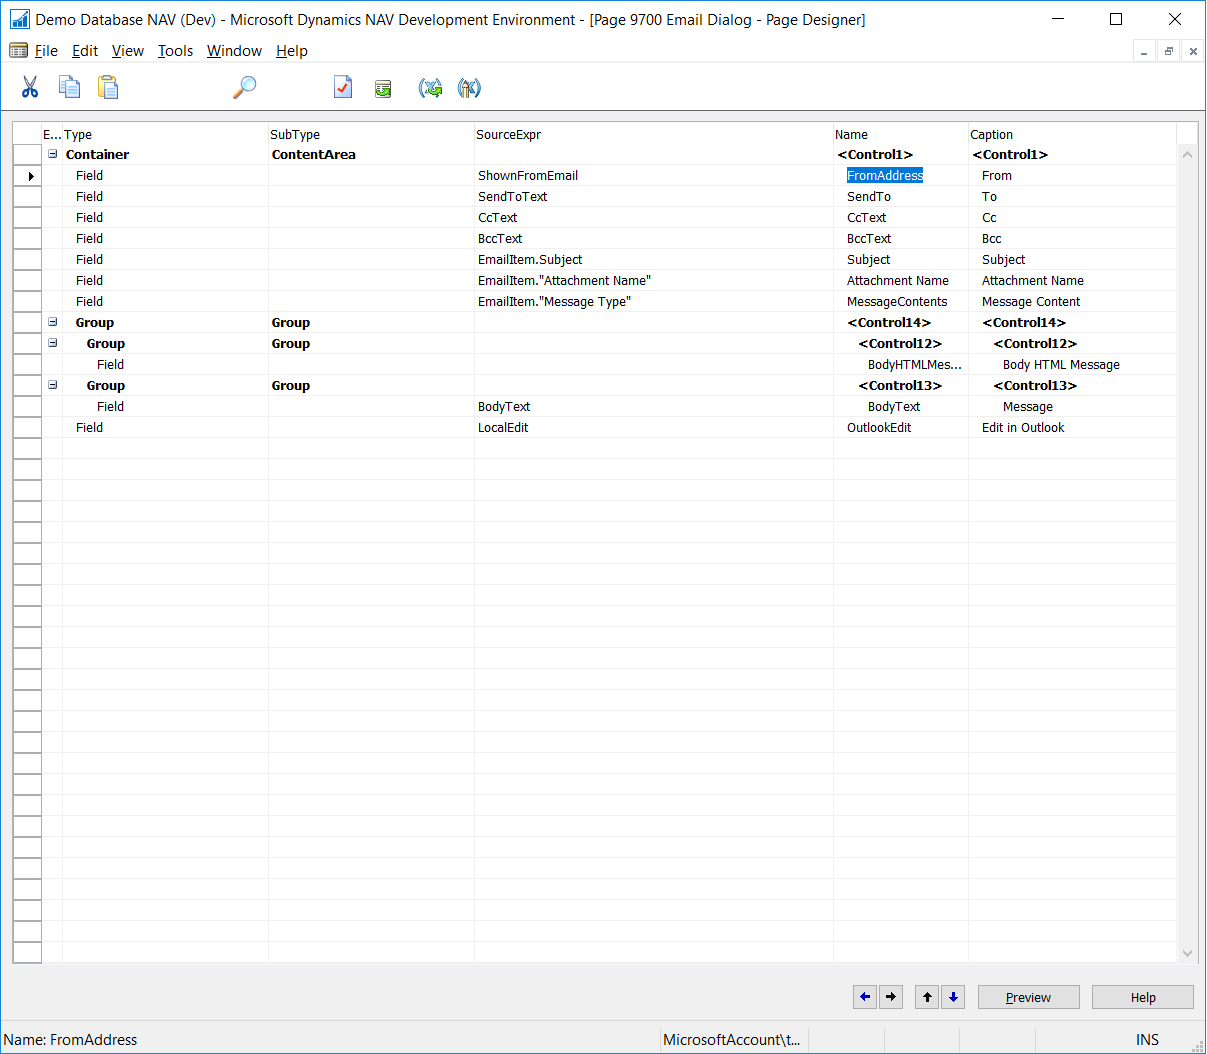
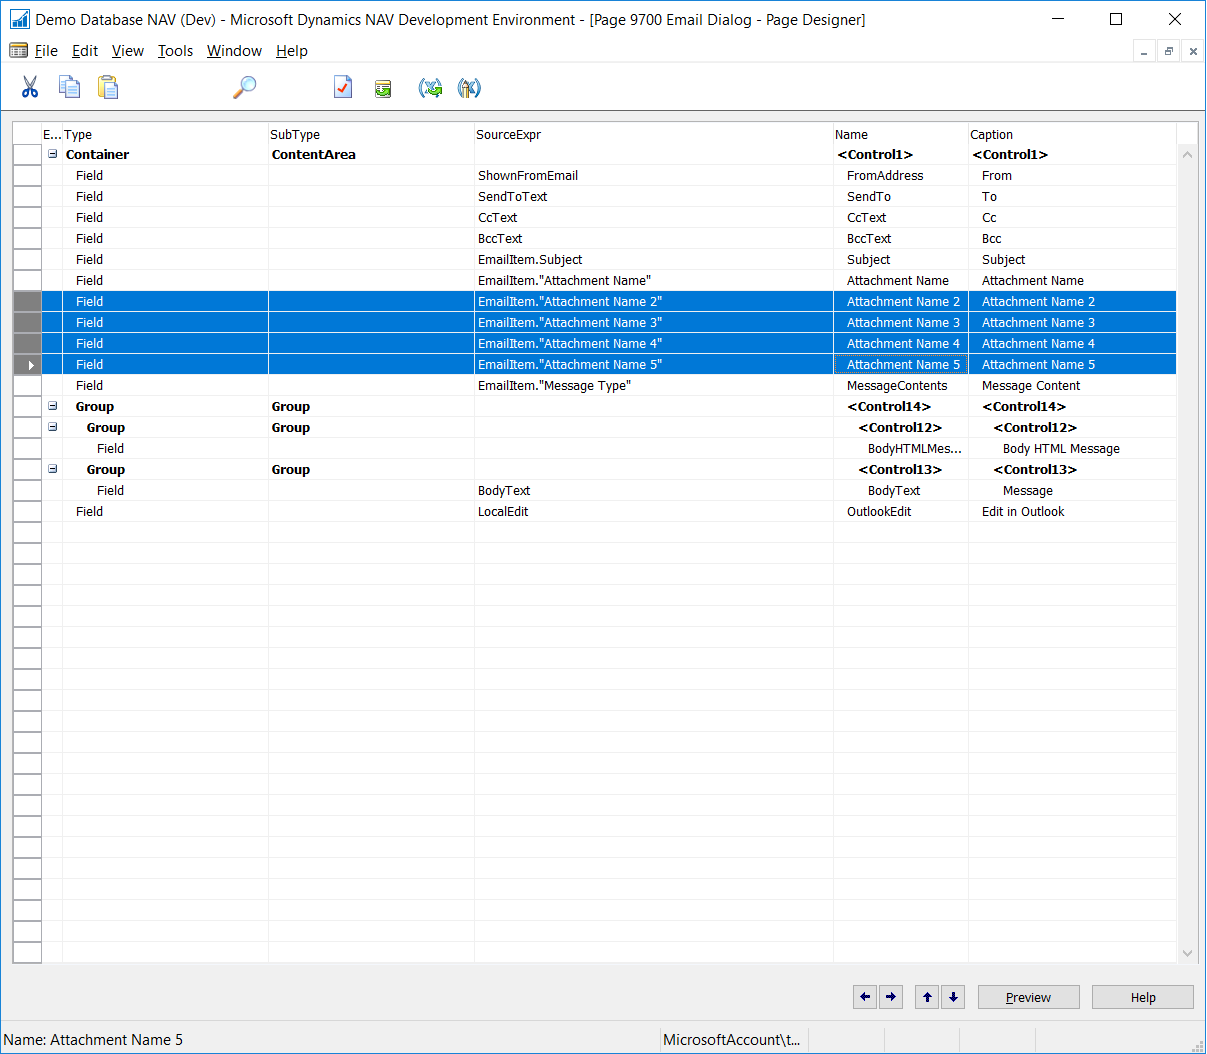
Step 5. Open the Development Environment and then Page 9700 Email Dialog.
One quick look at the page designer's interface and you can quickly see it's missing the other attachments. Looks like an easy fix, all we have to
do is add the missing files, right?
Zoom In
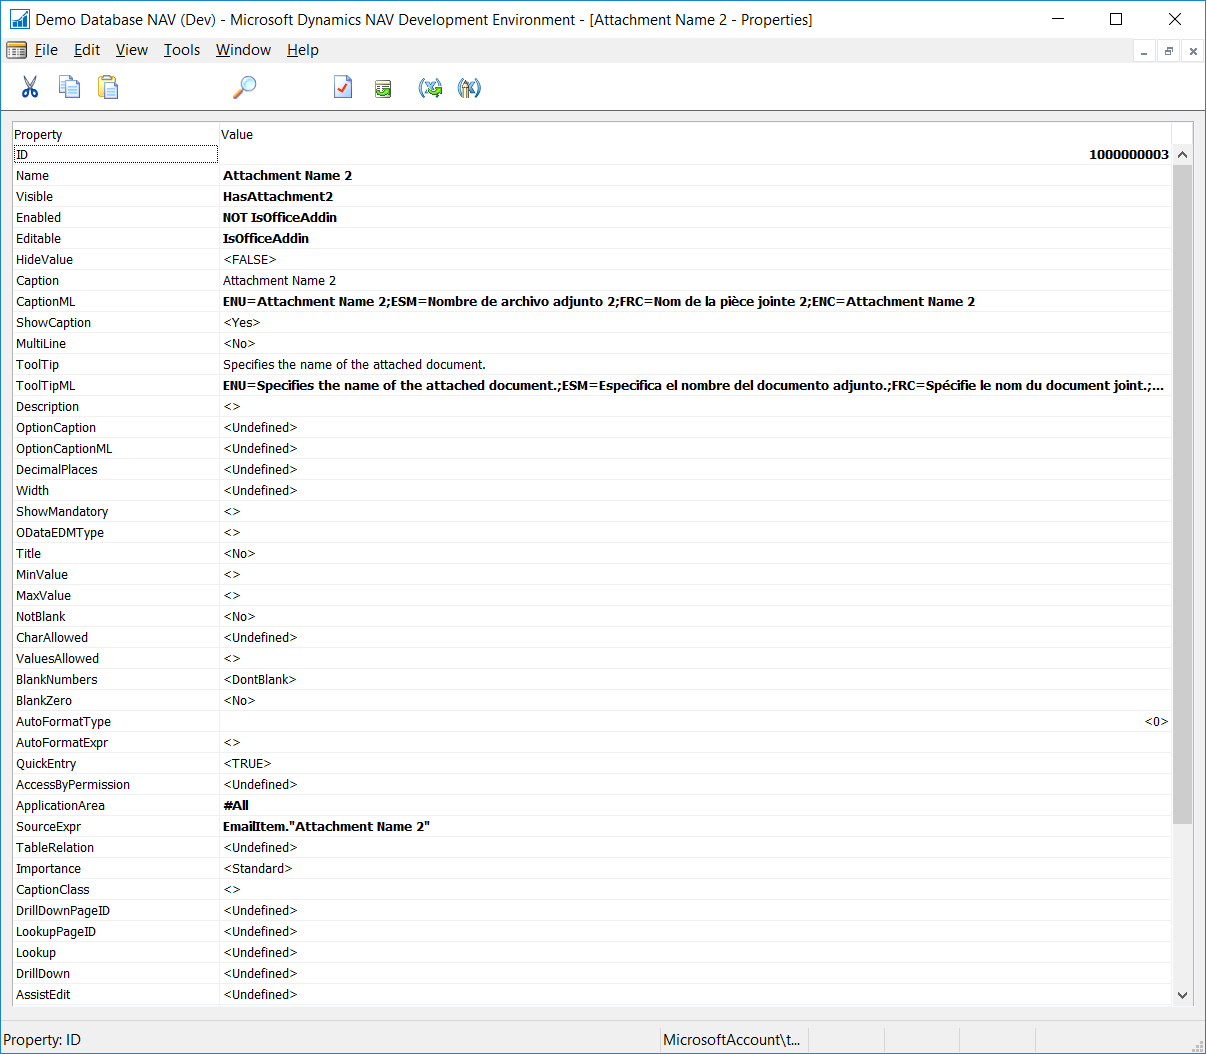
Step 6. Add the missing files.
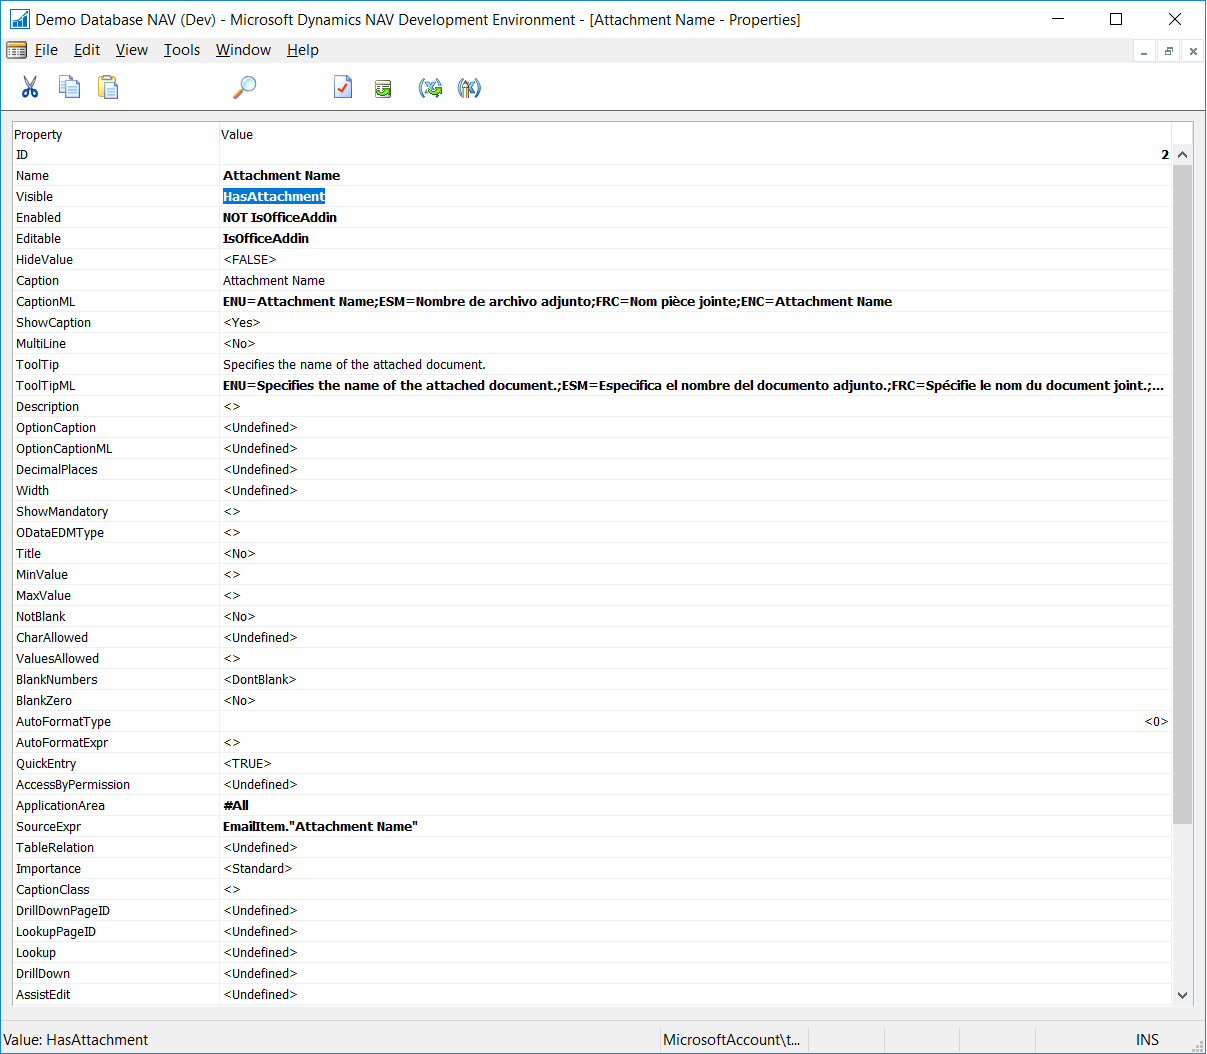
Before adding the missing files, let's see if the field has any non-default properties we need to take into account. A nice way to tell, whether
or not a property is a default property, is if it has Regular or Bold Text as a property value. Of course there will be fields, such as,
Name and SourceExpr, that can never have a default value, so we can ignore those. Here, we can see the Visible, Enable, and Editable properties
are being controlled by a variable.
Based on the variable's name, we can deduce that HasAttachment must mean the author wants this field to show only when there's an attachment.
As for the IsOfficeAddin, the name is pretty generic so I checked where the property is being set (IsOfficeAddin := OfficeMgt.IsAvailable;). I'm not
entirely certain what this means, but if I were to venture a guess, I'd say it has something to do with an office integration. However, the Enabled
and Editable properties are very related but what I'm seeing here doesn't make much sense since, Enabled, normally means the field can have focus,
while Editable means we can make changes to it. Assuming the IsOfficeAddin returns a True, that means the field is NOT enabled (cannot have focus)
but can be Edited? Inversely, if the IsOfficeAddin returns a False, it means the field is Enabled (can have focus), yet it's NOT editable?
In other words, there's a bug here but I'm not sure what the author's intentions are, therefore, I can't implement a fix, so I'll leave
it alone. This leaves us to worry just about the HasAttachment variable.
Zoom In
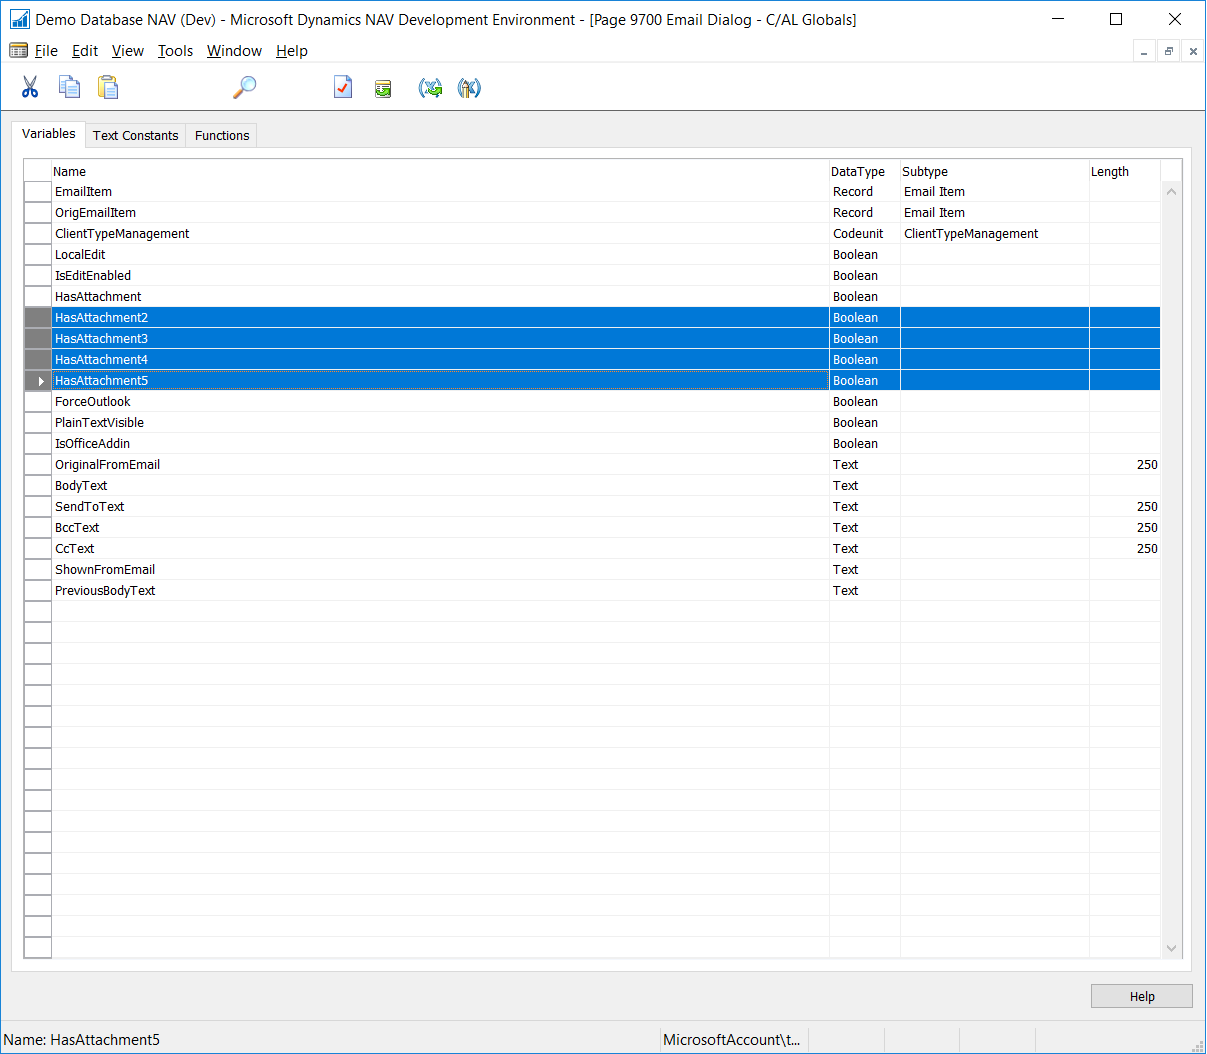
Step 7. Add the missing variables.
Open the C/AL Global and add the HasAttachment variable for each of the additional attachment we want to show.
Zoom In
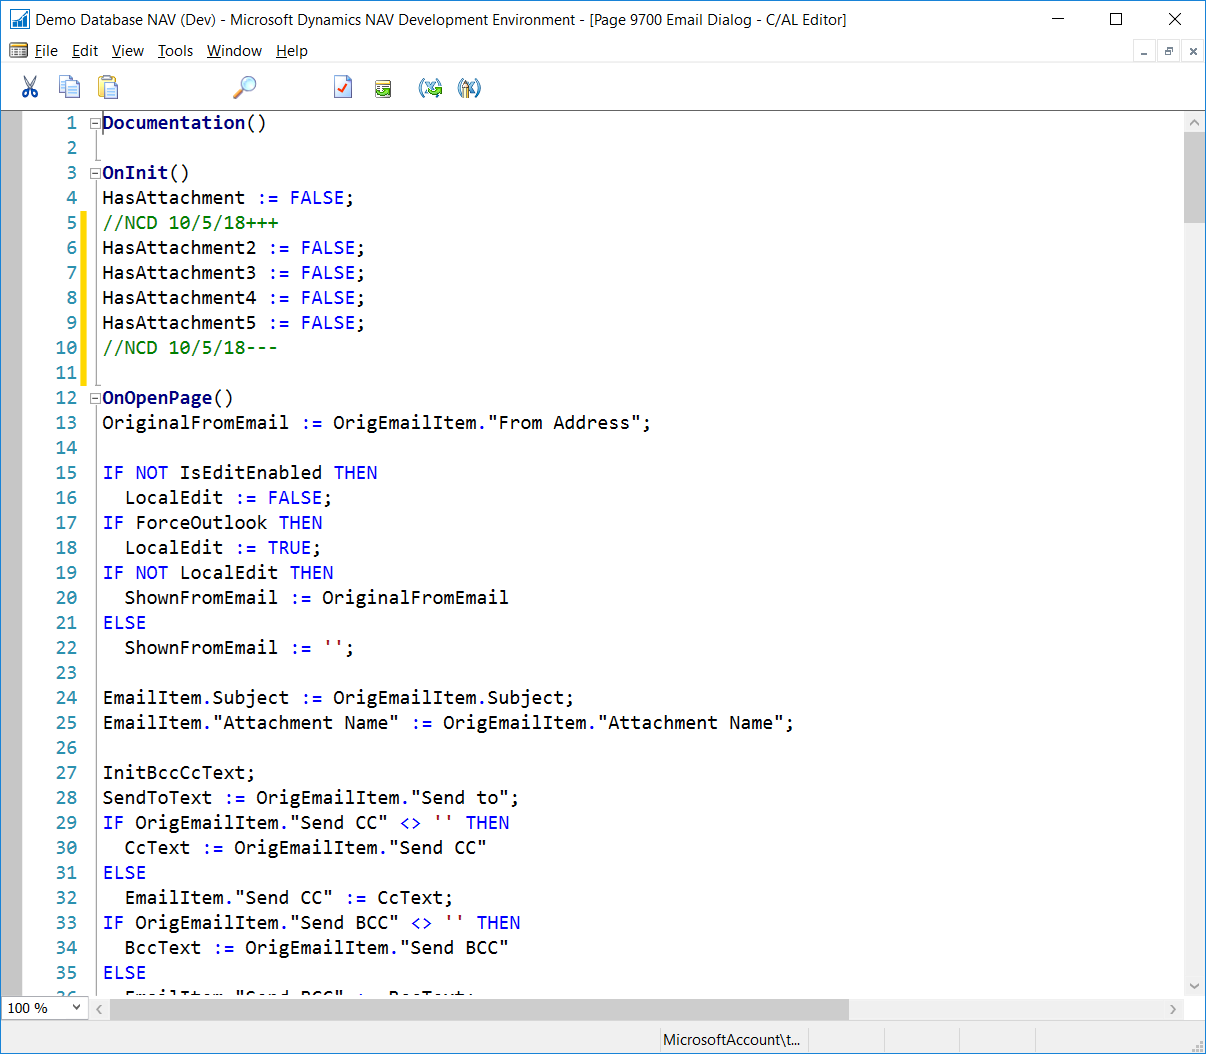
Step 8. Setting the variable.
Adding the variable is not all that we need to do, we'll also need to apply logic to it, and set it accordingly. Let's find out where the HasAttachment
is being set, so we can inject values for the new ones.
Zoom In
Zoom In
Step 9. Add the missing attachments to the page.
Zoom In
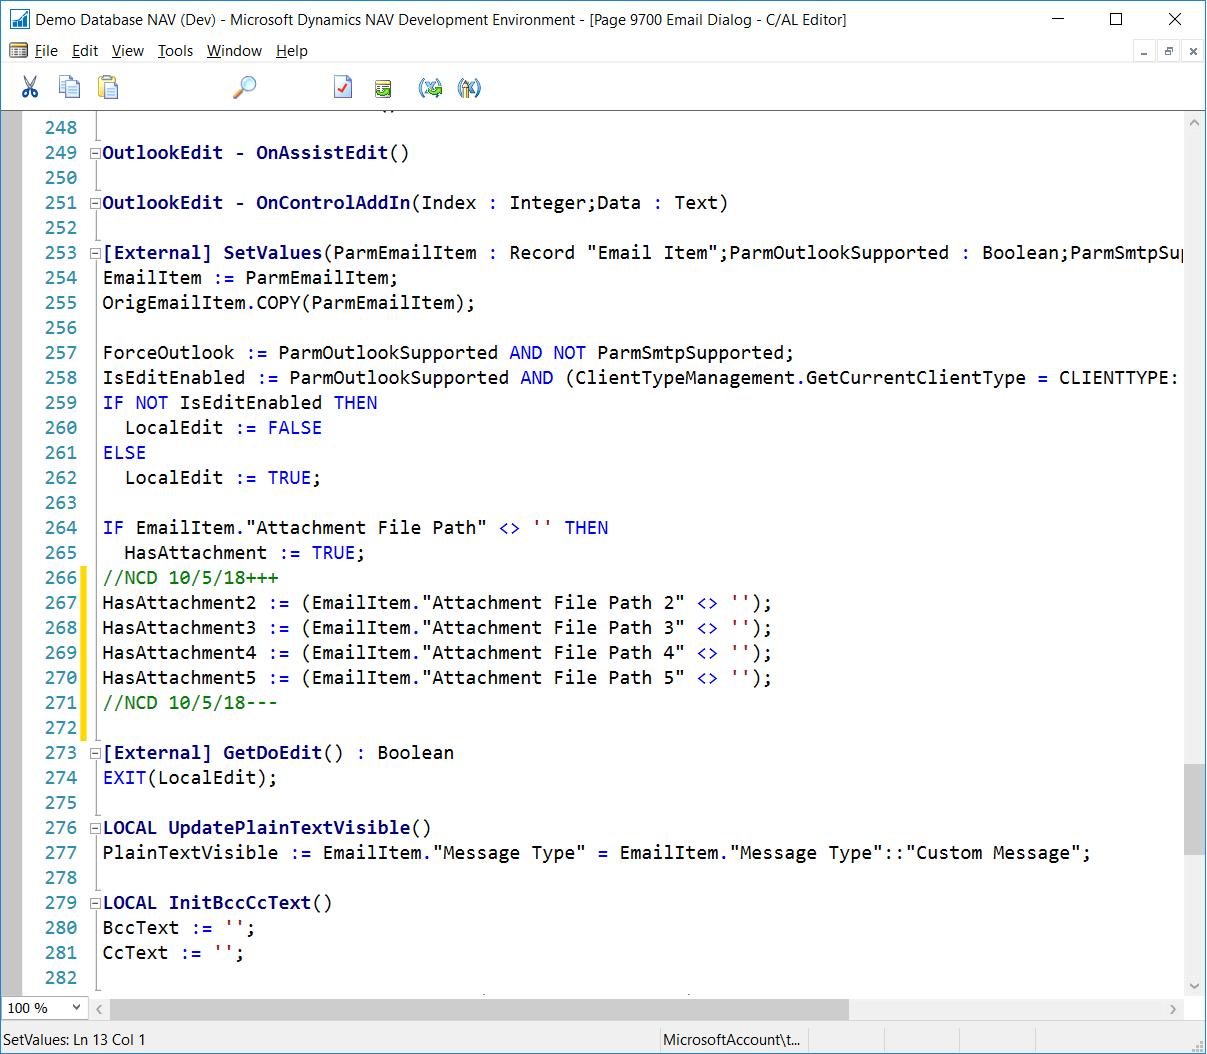
Step 10. Setting the properties.
Let's not forget, we still need to set the corresponding "HasAttachment" variable, for each of the attachment fields added. I'm not certain what
the author meant to use the Enabled and Editable field for, and even though it appears to be a bug, for sake of consistency, I'm going to set the
same values here.
Zoom In
Step 11. Check the change.
Let's repeat step 3 and see what we get. We should see 2, the invoice, and the incoming document attached.
Good, this is what we expect to see, however, let's add another document to be certain.
Zoom In
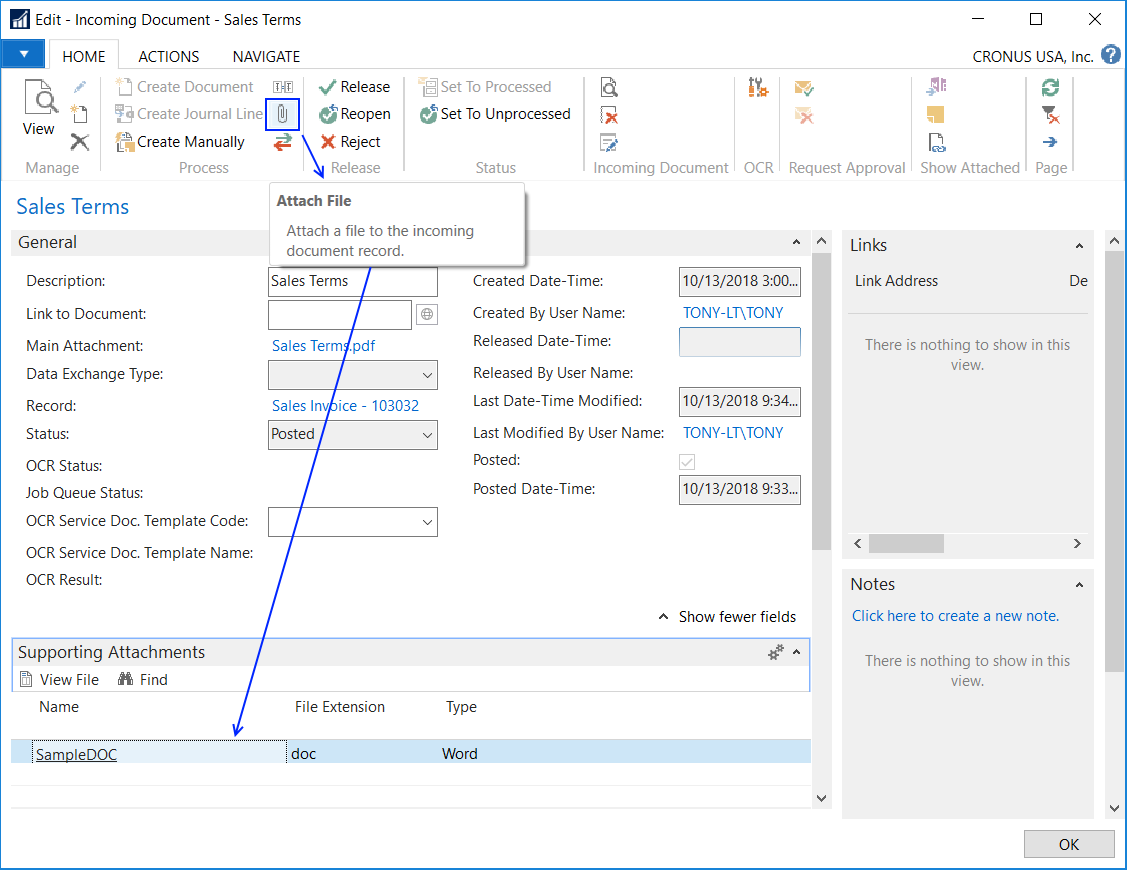
Step 12. Add more documents.
Click on the View Incoming Document from the Posted Sales Invoice's ACTIONS tab, to view the associated, Incoming Document.
Click on the paper-clip icon from the Process group, under the Home menu, to add a supporting attachment.
Zoom In
Step 13. Expecting 3 attachments.
Perfect, we see 3 attachments, and since the codes are identical, I'm comfortable enough to say that the others will work the same.
Zoom In
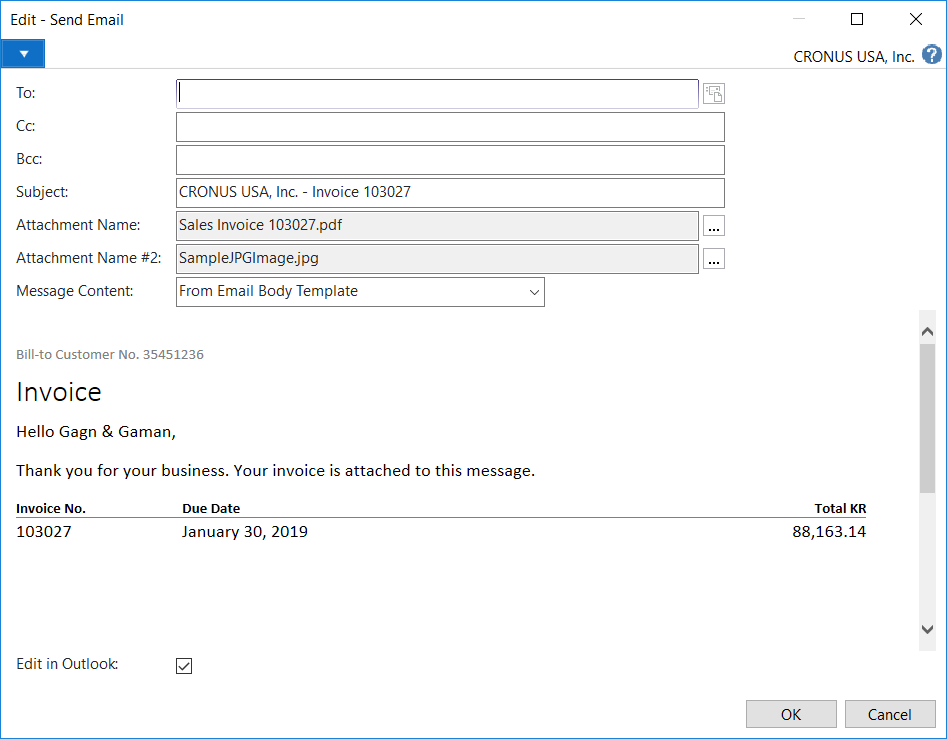
Step 14. Checking with another invoice.
To be extra sure, I checked my changes with a different invoice, and it looks correct, which is good.
Zoom In
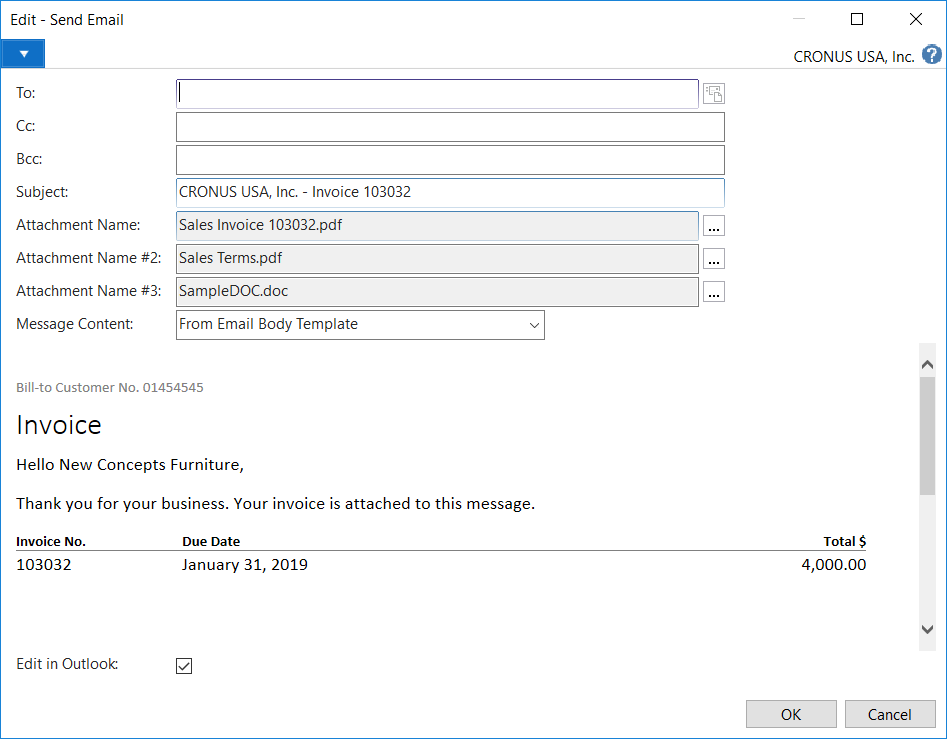
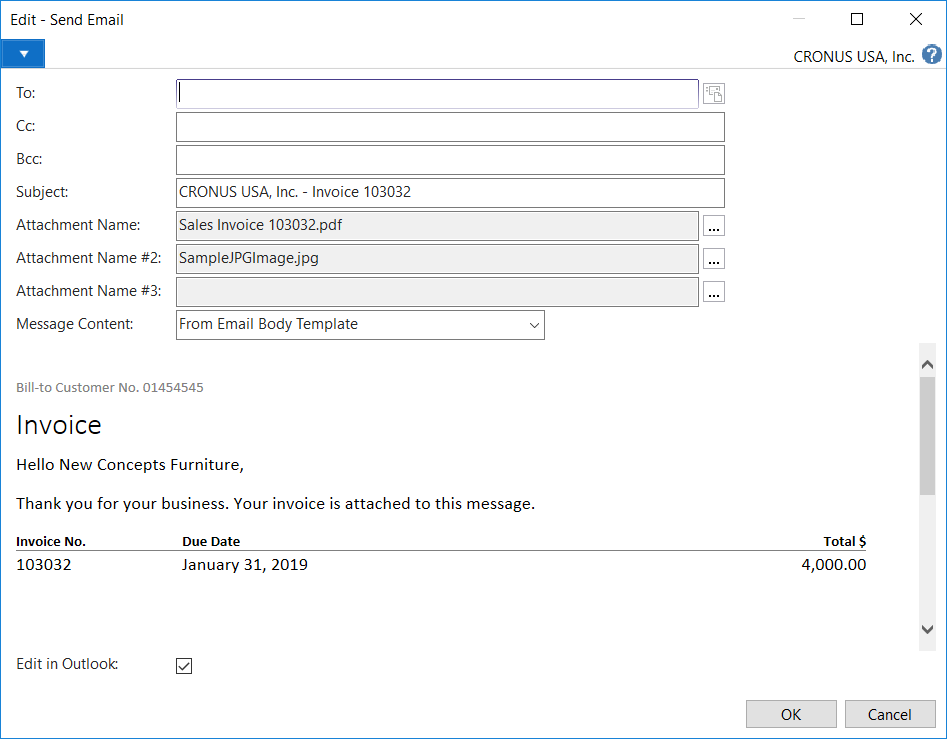
Step 15. Found a bug.
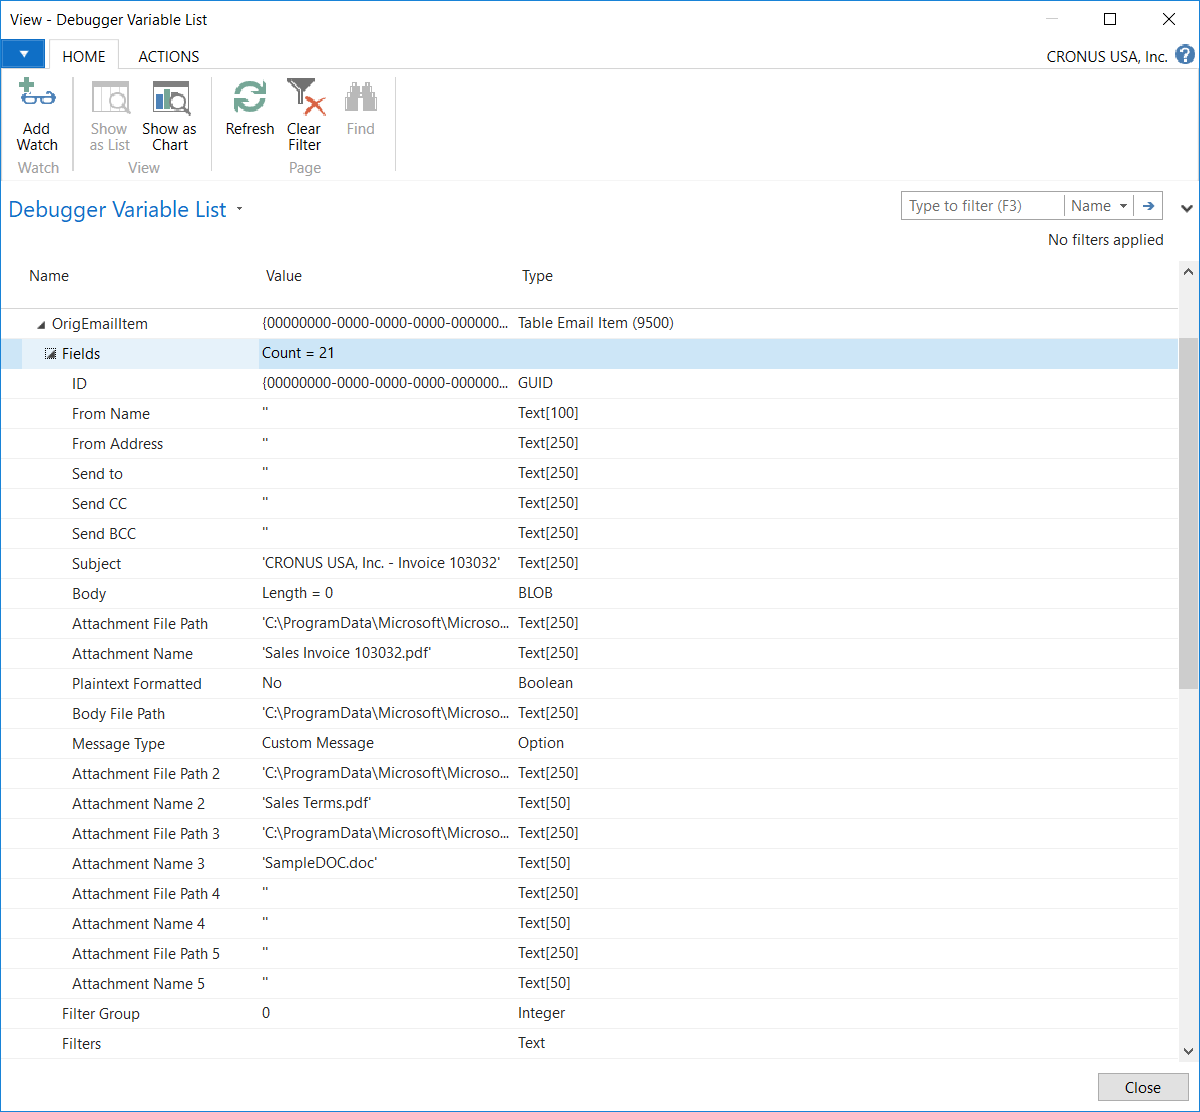
Unfortunately, when I switched back to the previous invoice, this is what I see. Instead of the "Sales Terms.pdf" and "SampleDOC.doc", I see
"SampleJPGImage.jpg", which was from the other invoice we just looked at, and an empty Attachment Name #3. How the heck could that happen?
Didn't we say it wasn't supposed to show the field if there wasn't a file? And that appears to be true, since #4 and #5 isn't visible.
Zoom In
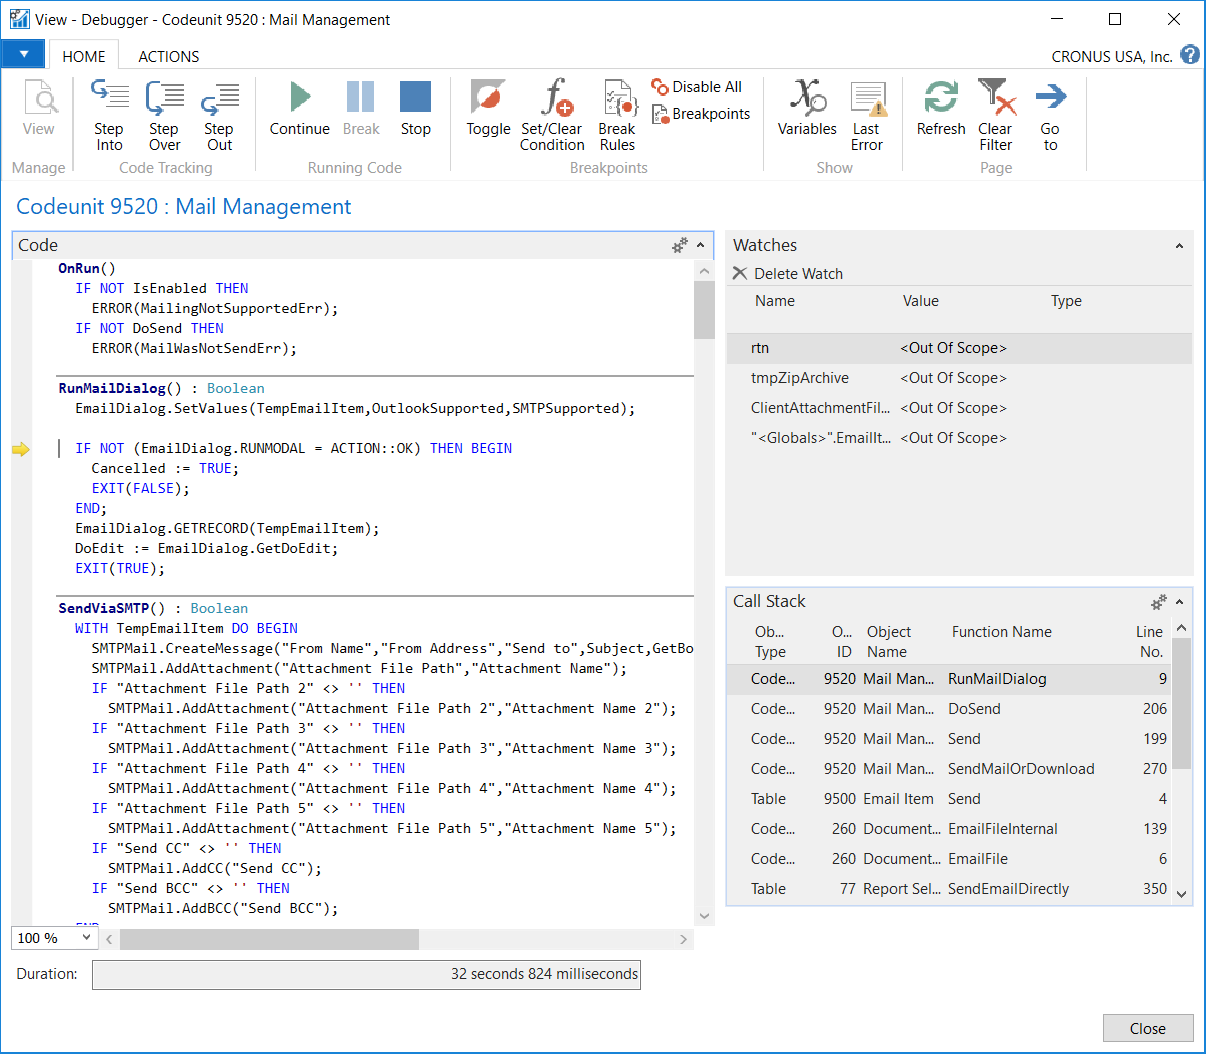
Step 16. Back to the drawing board.
Now we really need to dig deeper, to understand the process. To outline every step would be too much, therefore, I'm just going to skip to the
important ones. The first one I want to see, is how the variables are being set, which lead me here. Right before the Email Dialog is shown,
I can see that the SetValues function is called, with the TempEmailItem passed to it.
Zoom In
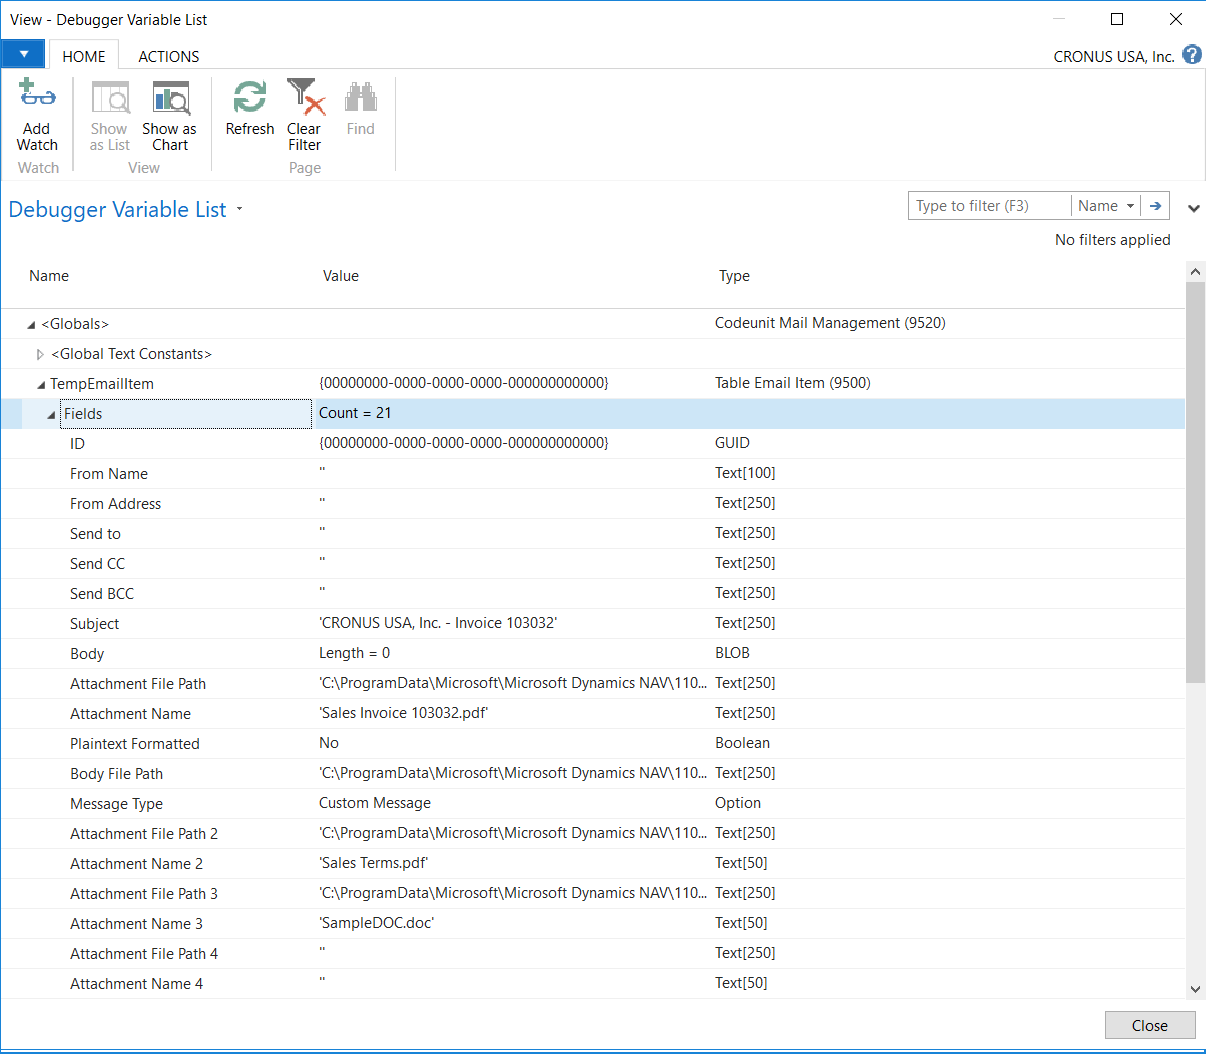
Step 17. Checking the values passed.
Here, we can see that the TempEmailItem's values look correct, when it's being passed to the dialog. Attachment Name 2 is "Sales Terms.pdf" and Attachment
Name 3 is "SampleDOC.doc".
Zoom In
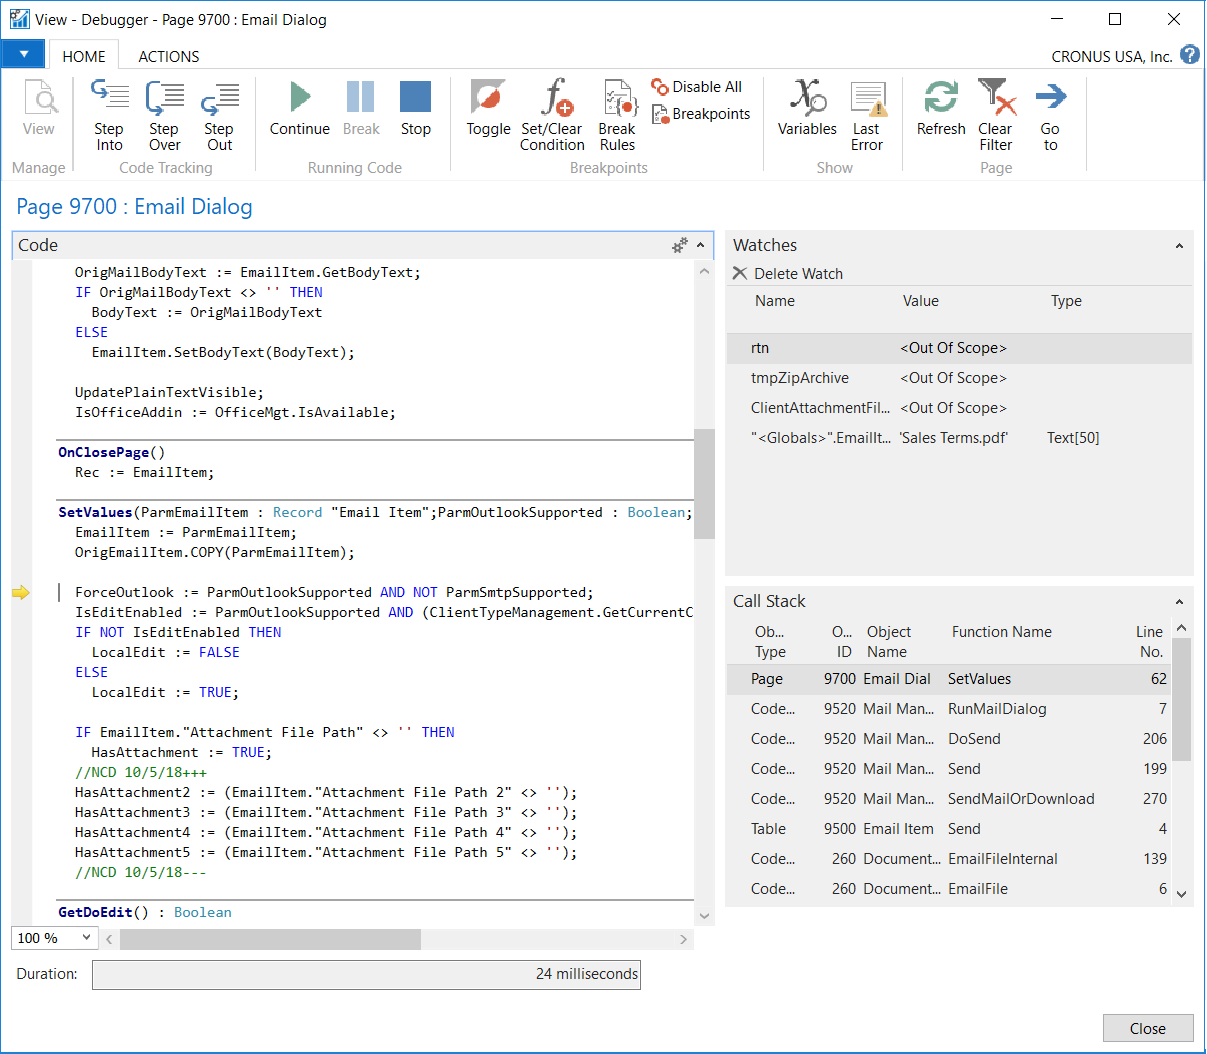
Step 18. Looking deeper.
The values being passed are good, so perhaps the problem is somewhere inside the SetValues function. Stepping into this function, everything looks fine,
although it was a bit odd why the author chose to set the dialog's EmailItem variable to be a referenced copy of the TempEmailItem variable being passed,
while there's also an OrigEmailItem, that does a copy of the record.
Zoom In
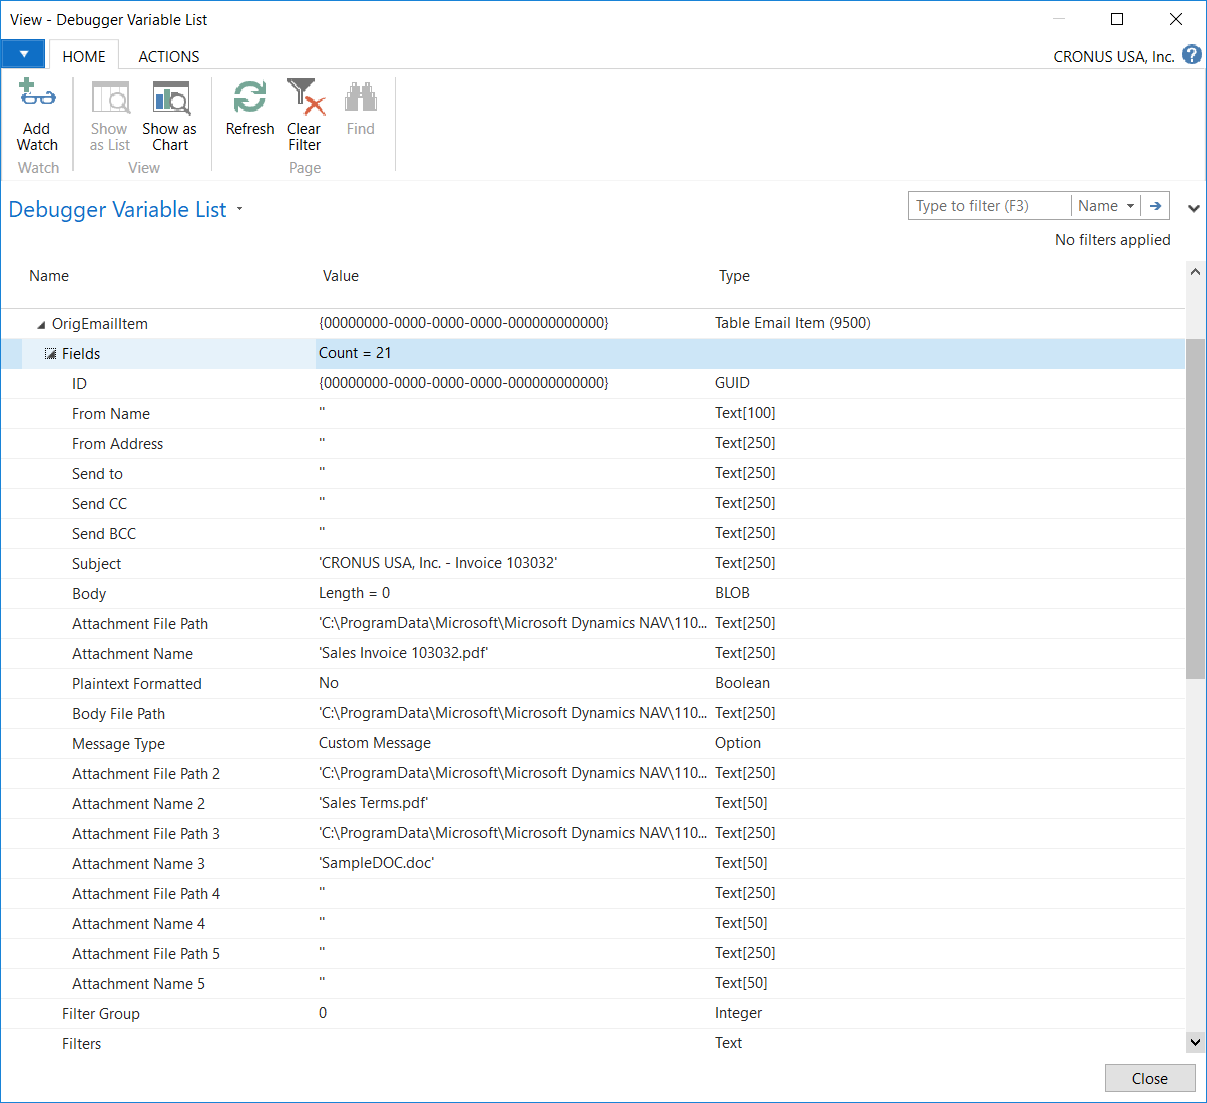
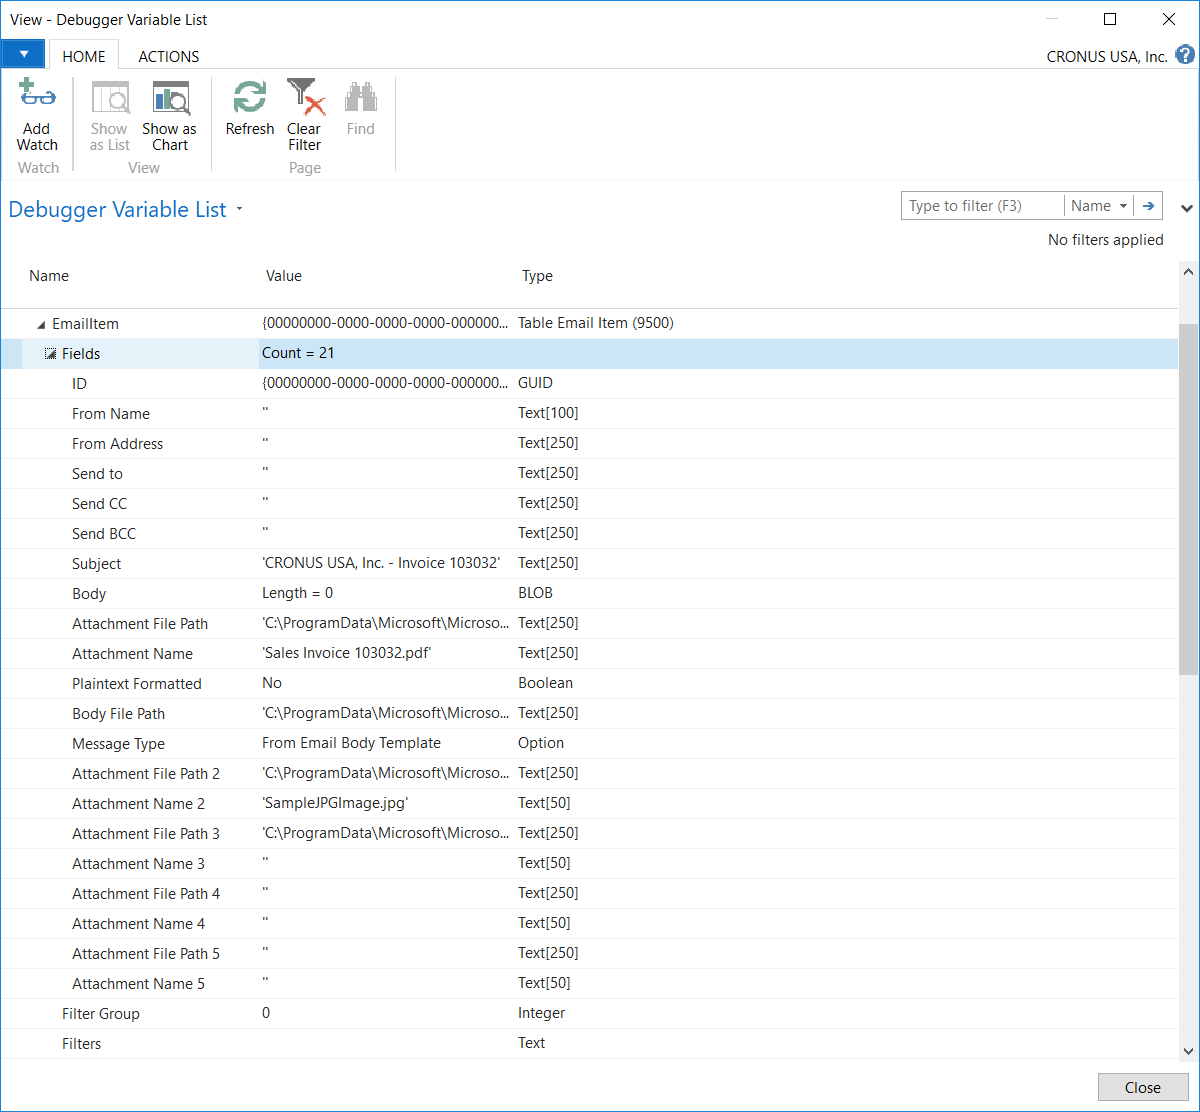
Step 19. Comparing the variables.
Regardless of the reason, let's see if there are any difference between the EmailItem and OrigEmailItem. Their values are identical.

Zoom In
Zoom In
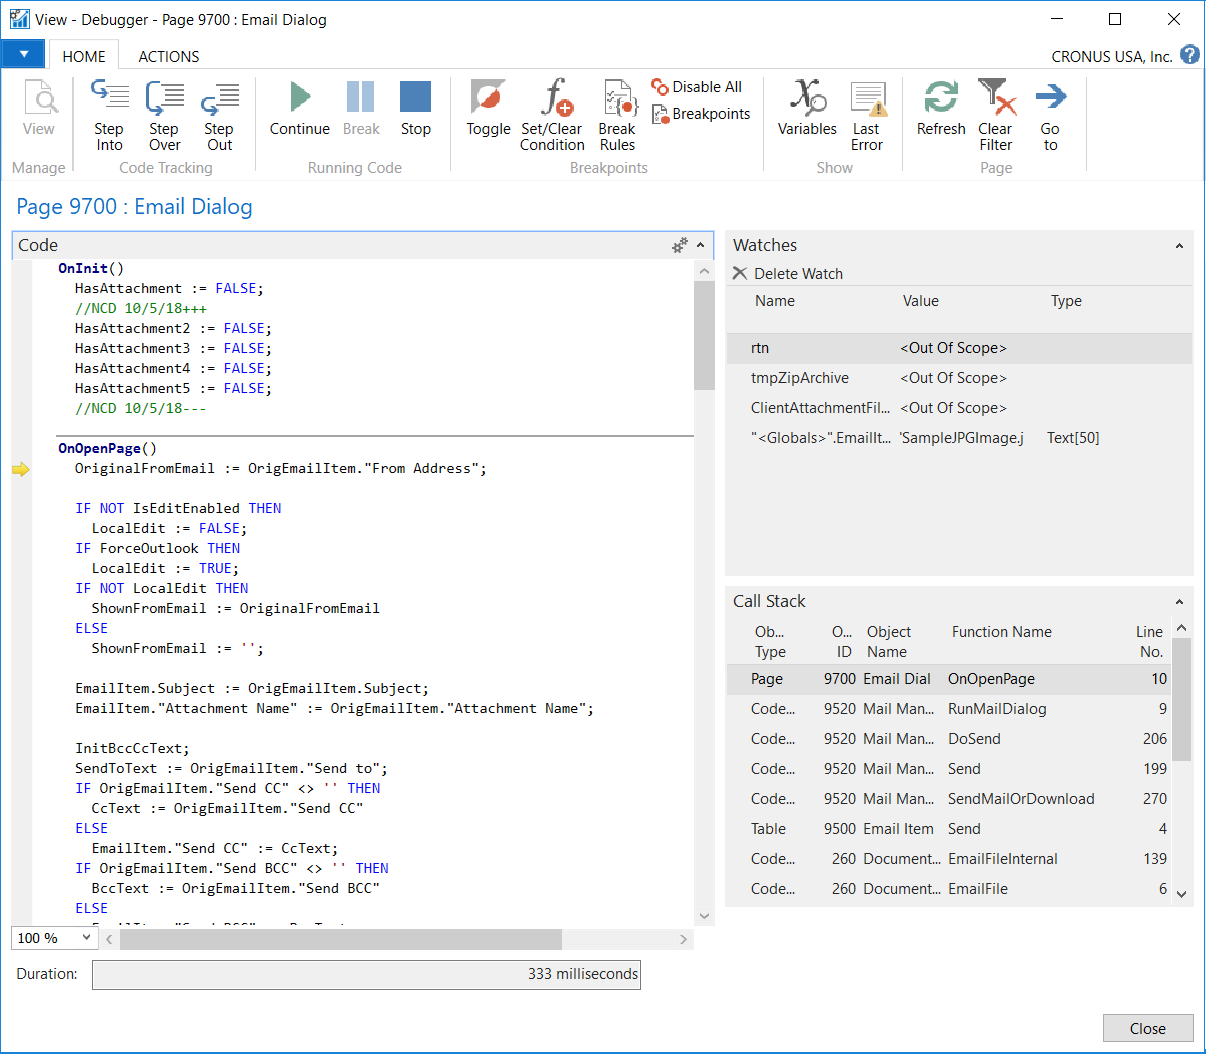
Step 20. Continue stepping through the codes.
The SetValues function looked fine and the variables looked fine as well, so let's continue stepping through the code, to try and figure out why it
doesn't display properly.
The OnOpenPage() function is the first step to show, when stepping into the (EmailDialog.RUNMODAL...).
Our first clue.
Here, we can see some fields from the EmailItem, are being replaced with values of the same field, from the OrigEmailItem. But weren't they identical
when it was set in the SetValues function?
Zoom In
Step 21. The aha moment!
Let's check the variables again, to see why we need to copy values from the OrigEmailItem, to the EmailItem.
Very odd, we only took a few steps, did not skip through anything, yet the EmailItem's values seem to mysteriously changed. The fact that the author
created an OrigEmailItem, to get a 2nd copy of the data, tells us that the author is aware of this issue, thus they created this variable as a workaround.
The next few lines of code in the OnOpenPage() is merely copying data from the OrigEmailItem variable, back into the EmailItem variable, or relying on
it to set some local variables.
Zoom In
Zoom In
Step 22. Why? Why? Why?
To properly fix a problem, we must first try to understand why something's being done the way it is. Looking back at the Page Designer, we can see the
From is tied to the ShownFromEmail variable, To is tied to the SendToText variable, and so forth. On the other hand, the Subject, Attachment Name,
Message Content, is tied to the EmailItem variable. This explains why, in the OnOpenPage(), the author was setting some variables with values from the
OrigEmailItem, and the Subject and Attachment Name from the EmailItem are the only 2 being replaced in that variable. In other words, the
OrigEmailItem is holding the data for everything shown on the page, and is being used to restore values, but why did we have to do that?
Zoom In
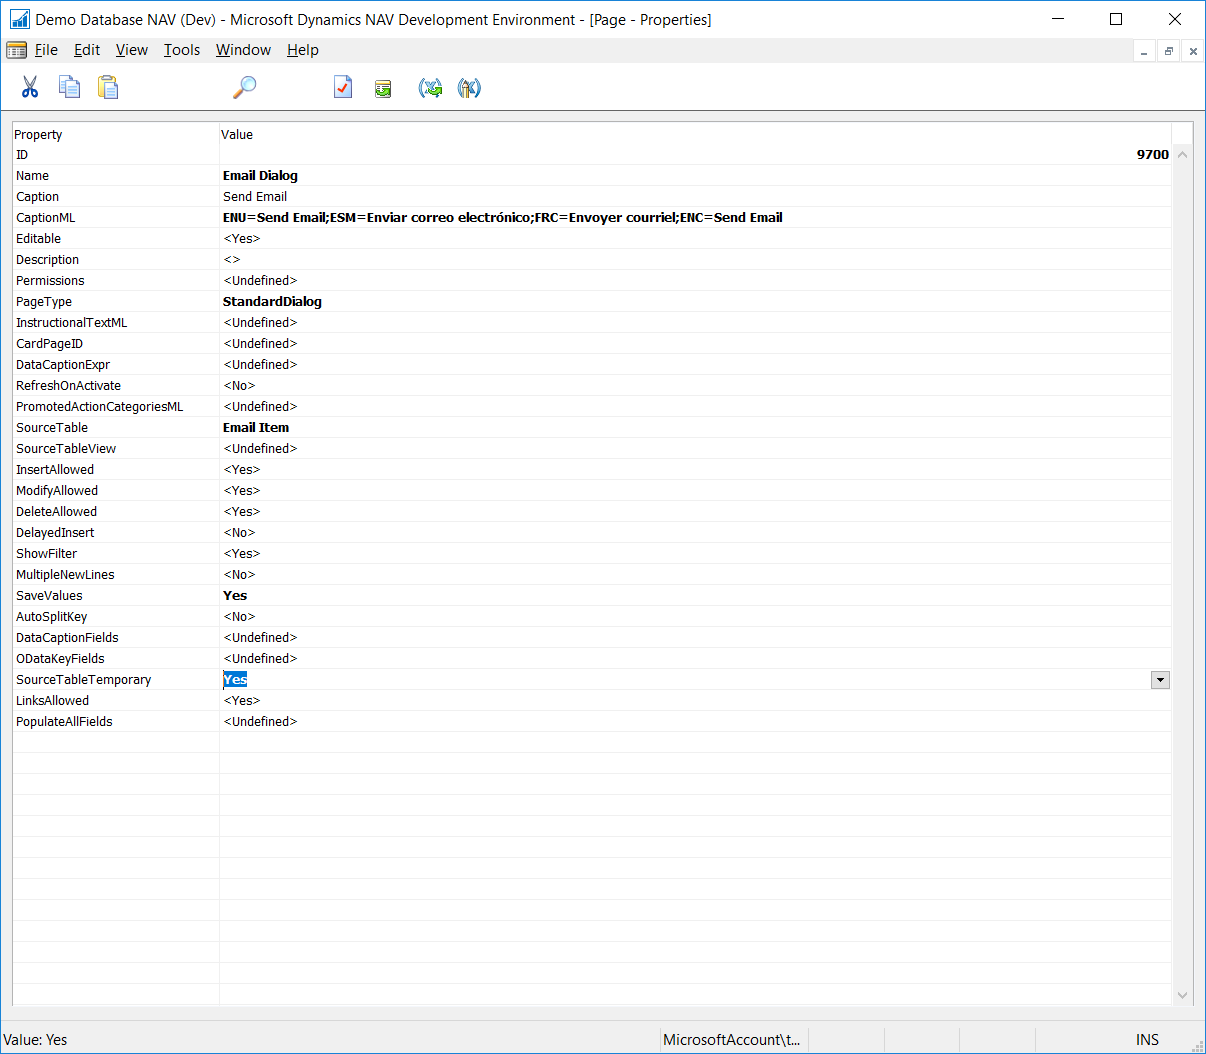
Step 23. Let's take a look at the Page's Properties.
Here, we can see the SourceTable is Email Item, which means we could've just use this, instead of defining all the extra variables, to hold data for the
page. The SourceTableTemporary setting is Yes, which is good, we're only using it to display data, we don't want to save anything.
The second clue.
The SaveValues property is set to Yes. So that explains the mysterious change, and why the data from the previously shown Email Dialog, was showing up
in place of the new one. Without knowing for sure why that's set, I temporarily turned it off to see if it fixes the issue. Bam! It did! Unfortunately,
this isn't the fix. Playing around with it a little more, I understood why the author wants to turn that variable on. Note the page's "Edit in Outlook"
check box. In order to remember the option, the SaveValues property must be set to Yes.
Zoom In
Step 24. The workaround.
Apparently, the SaveValues property is breaking things for us, but we want to be able to retain some values, therefore, the only option is to work
around this drawback. Instead of copying the individual properties that we need from the OrigEmailItem to the EmailItem, I just did that with a
single TRANSFERFIELDS command, which technically does the same thing, even though we don't need everything.
On a different note, it shouldn't be necessary to complicate things with all the extra variables and EmailItem variable, we could've done the
exact same thing with the page's temporary, Email Item record, and do a single TRANSFERFIELDS to that record, from the OrigEmailItem record
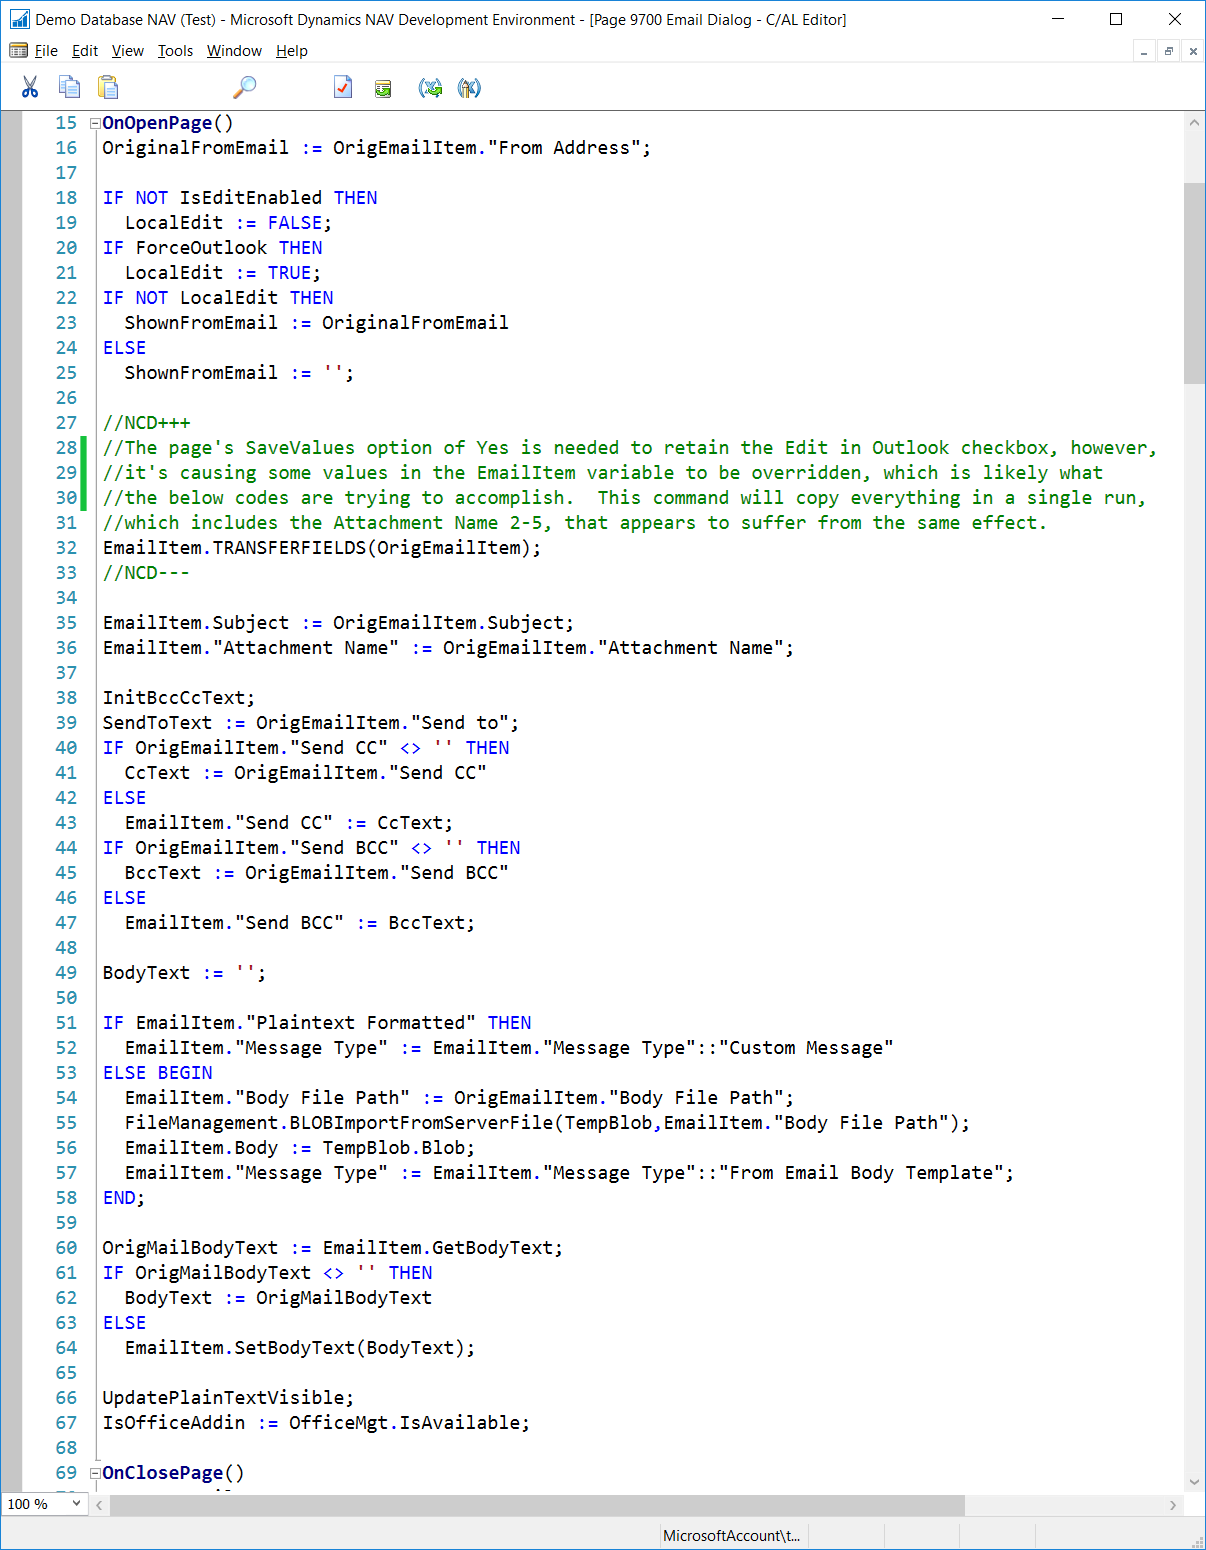
Zoom In