Starting with NAV 2015, a new table (9500 Email Item) and Codeunit (9520 Mail Management) was introduced as a method for sending emails,
which can include attachments. However, up until NAV 2017, we can only include 1 attachment in each email. Beginning with NAV 2018,
we can include up to 5 attachments but this is where I found a bug. This bug occurs only if we check the box "Edit in Outlook",
where the email will be opened in Outlook for us to review before sending the email.
Description
In this tutorial, I will show you how to debug and fix the missing attachments issue, which was found in Codeunit 9520 - Mail Management.
Identifying the Bug
The bug that I found, was when sending multiple attachments via email and reviewed in Outlook, that only 1 is actually attached. We'll start
by performing the operation that is affected by the bug. By the time we finish this tutorial, this same operation can be used
to verify, whether or not, the bug has been fixed.
Download our fix for Free!
Until there is an update that patches this bug, for customers who want to apply the fix, but don't have the object modification license, you may
download this FOB file, and import it at your own discretion. This fix applies to NAV 2018 only, not the earlier versions, nor will it enable
earlier versions to be able to include more than 1 attachment per email.
NOTE: Before importing this file, always make a backup of your existing objects!
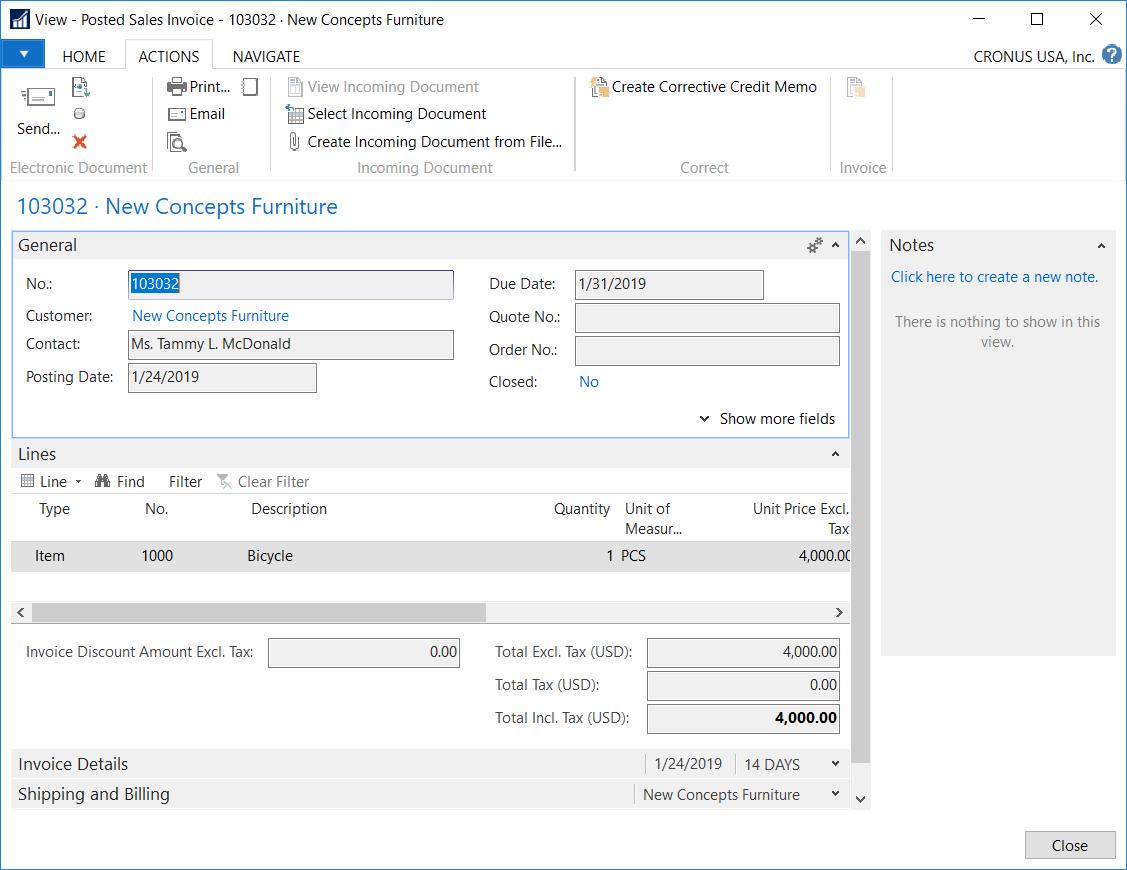
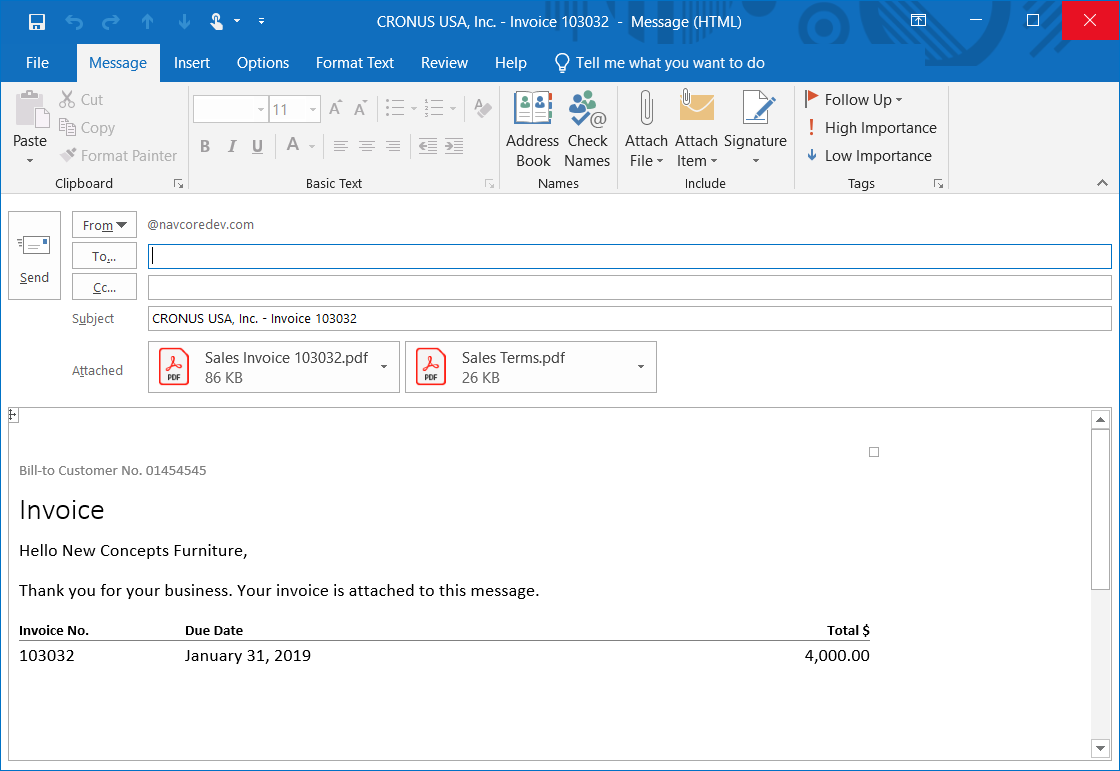
Step 1. Open a Posted Sales Invoice to send an Email from.
In order to create a sample email that has multiple attachments, we'll use NAV's built-in feature for including, Incoming Documents,
as an additional attachment to the invoice itself, when emailing. If the invoice already has an Incoming Document associated, then we can skip to step 3.
Zoom In
Step 2. Attach a sample, Incoming Document.
You can use the Select Incoming Document or Create Incoming Document from File..., from the Actions tab to do this. We just need to attach something
so it can force an additional attachment to appear, when sending an email.

Zoom In
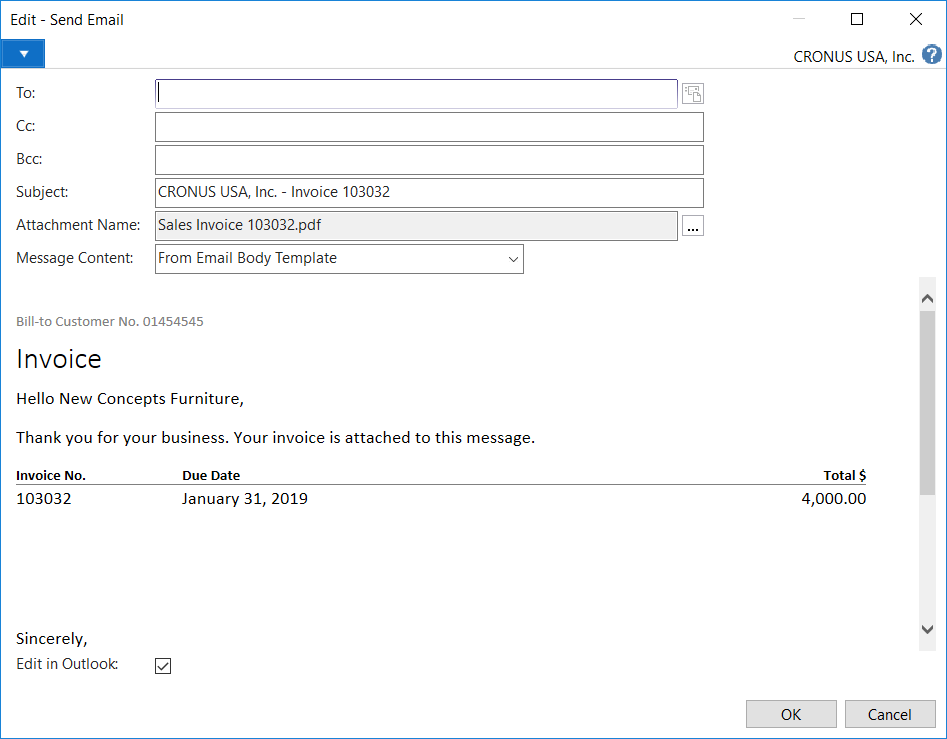
Step 3. Email the document.
Click on the Email menu item from the Actions tab on the Posted Sales Invoice. NAV will take a few seconds to create the invoice as an attachment,
then look for and include the Incoming Document as an additional attachment, if it exists. What you're seeing here is the Email Dialog, but it too
has it's own shortcomings that we will need to address. Please see my tutorial on how to fix the Email Dialog, to allow it to show the additional
attachments.
Make sure the Edit in Outlook is checked, then click OK to continue.
(NOTE: If this is not checked, when you click OK, then the email will be sent directly, using SMTP, which doesn't suffer from this bug.)
Zoom In
Step 4. As you can see here, the email that's opened in Outlook does not show the additional, Incoming Documents attachment, when it was
supposed to. The reason is because of a bug in the code, which is something we'll be fixing.

Zoom In
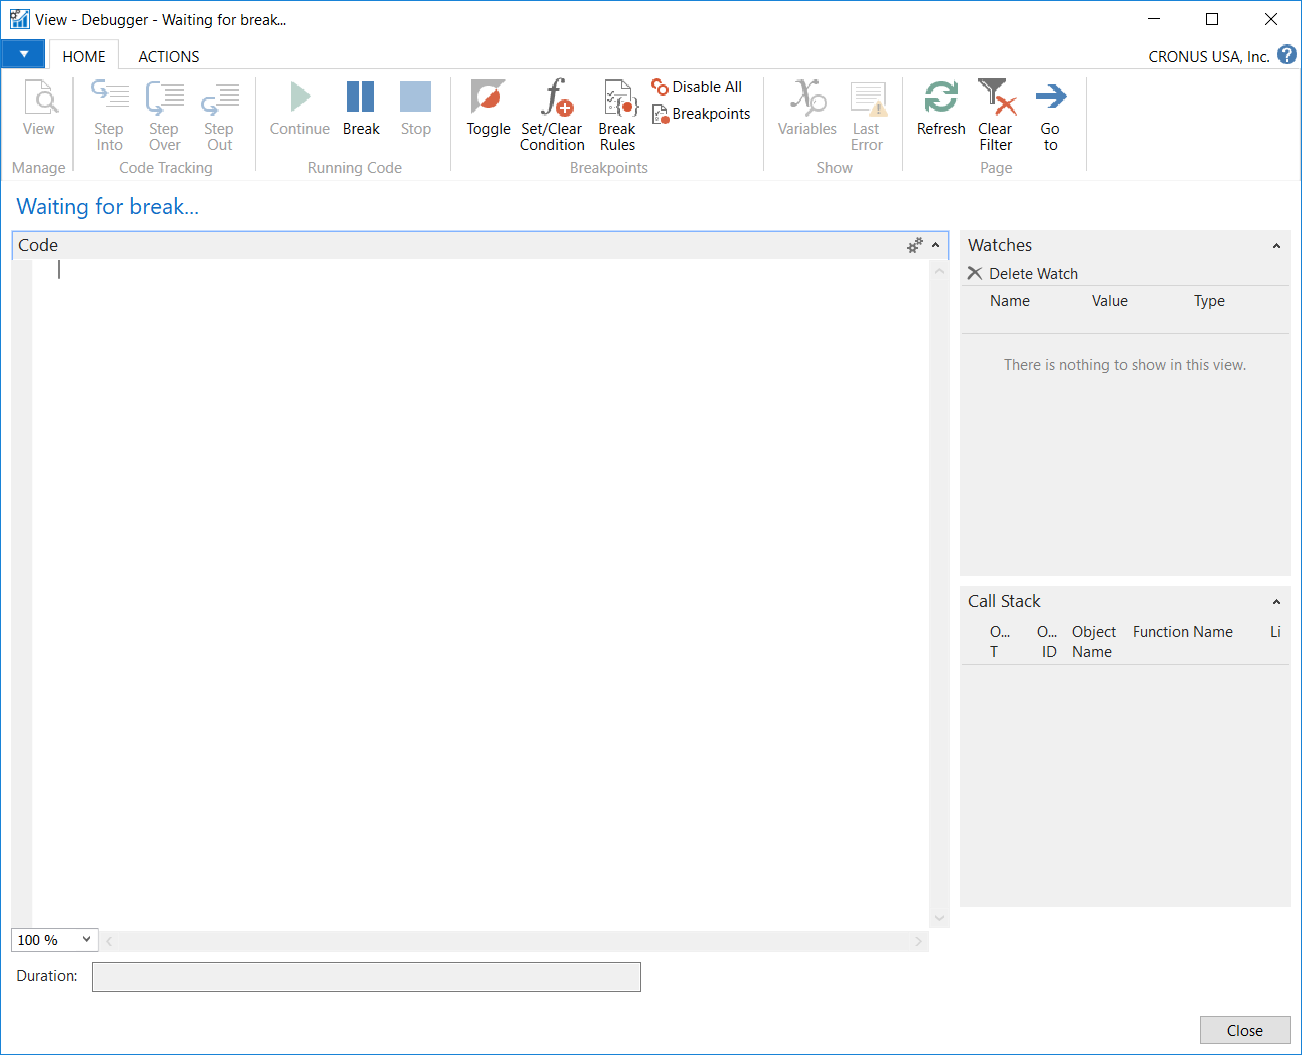
Step 5. Open a Debugger window.
Attach it to the NAV session that you have opened then repeat step 3. After the Email Dialog opens, switch back to the debugger and click Break.
This is a good starting point for us since it's very close to where we found our bug. Once again, you'll need to switch back to the Email Dialog,
and click OK to continue. This is when the debugger will actually kick in and we can see exactly where we are in the stack.
Zoom In
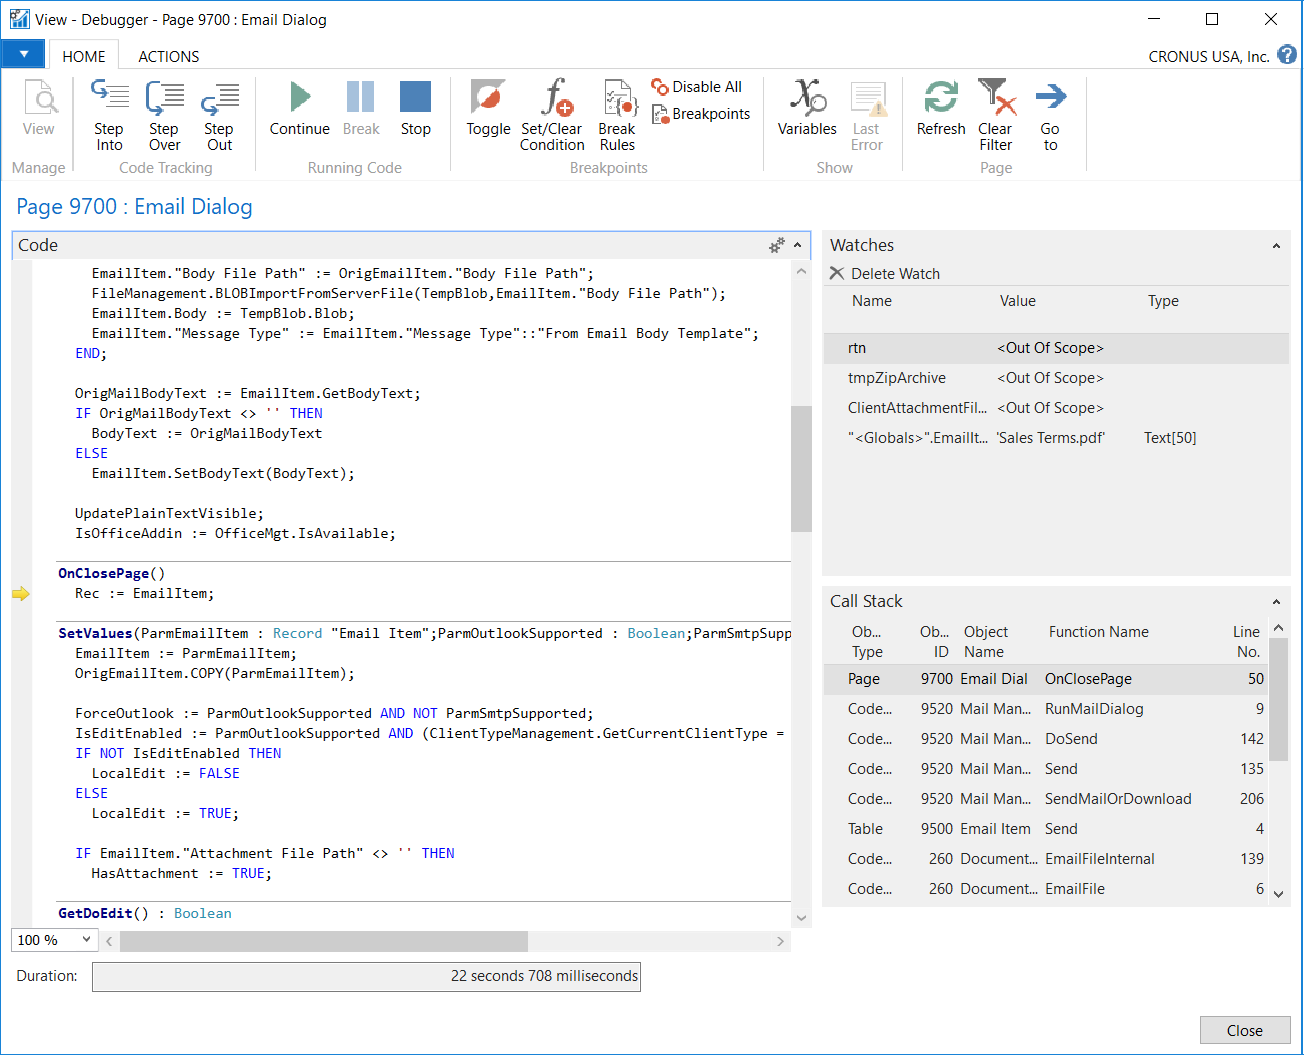
Step 6. Searching for clues.
As you can see here, the debugger kicked in and stopped right where the Email Dialog was closed, when we click the OK button.
On the bottom right is the Call Stack, where we can rely on to retrace the steps. We will need to step through each stack, to find the area that has
references to the attachment.
Zoom In
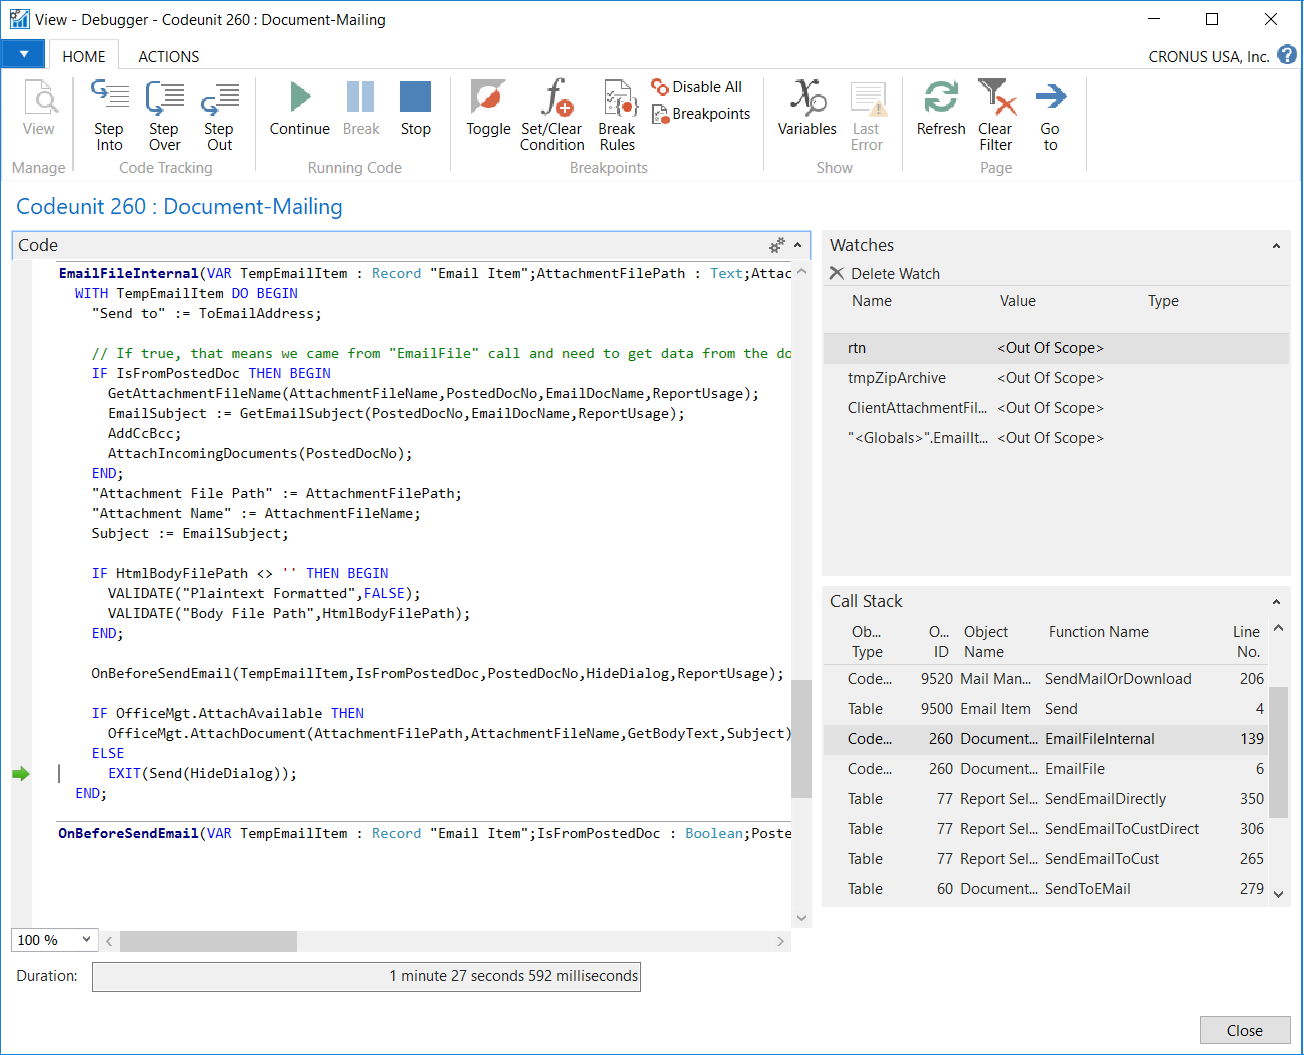
Step 7. Our first clue.
Here, we can see where the attachment is being referenced in the "Attachment File Path" and "Attachment Name".
Note the line with the AttachIncomingDocuments(...), obviously, that's where the Incoming Documents are being attached. The problem can either be
a bug in this function, or it could be somewhere else. To be certain, set a break-point there and re-run the process. Once it stops there,
step through the codes to see if the attachments are being attached. To avoid making this tutorial too long, I'm not documenting that step but I
can tell you that it's not in that area.
Zoom In
Step 8. Continue to step through the codes, and look for clues as we go.
There can be an overwhelming amount of codes to step through, therefore, to save time, pay attention to what each function may be doing and use F10
to step past it, or F11 to step into it. To save even more time, instead of stepping through each line, I like to skim through it and set a break-point
where I think I can quickly skip to, then I click F5 or the Continue button, to let the debugger go straight to that point instead. Obviously, it won't
be perfect and we can accidentally overstep the bug, which means we'll need to restart the steps all over again. With that in mind, it's a good idea
to set break-points where we know for sure the problem doesn't or hasn't occurred, so we can quickly get back to that step, without having to step
through everything again.
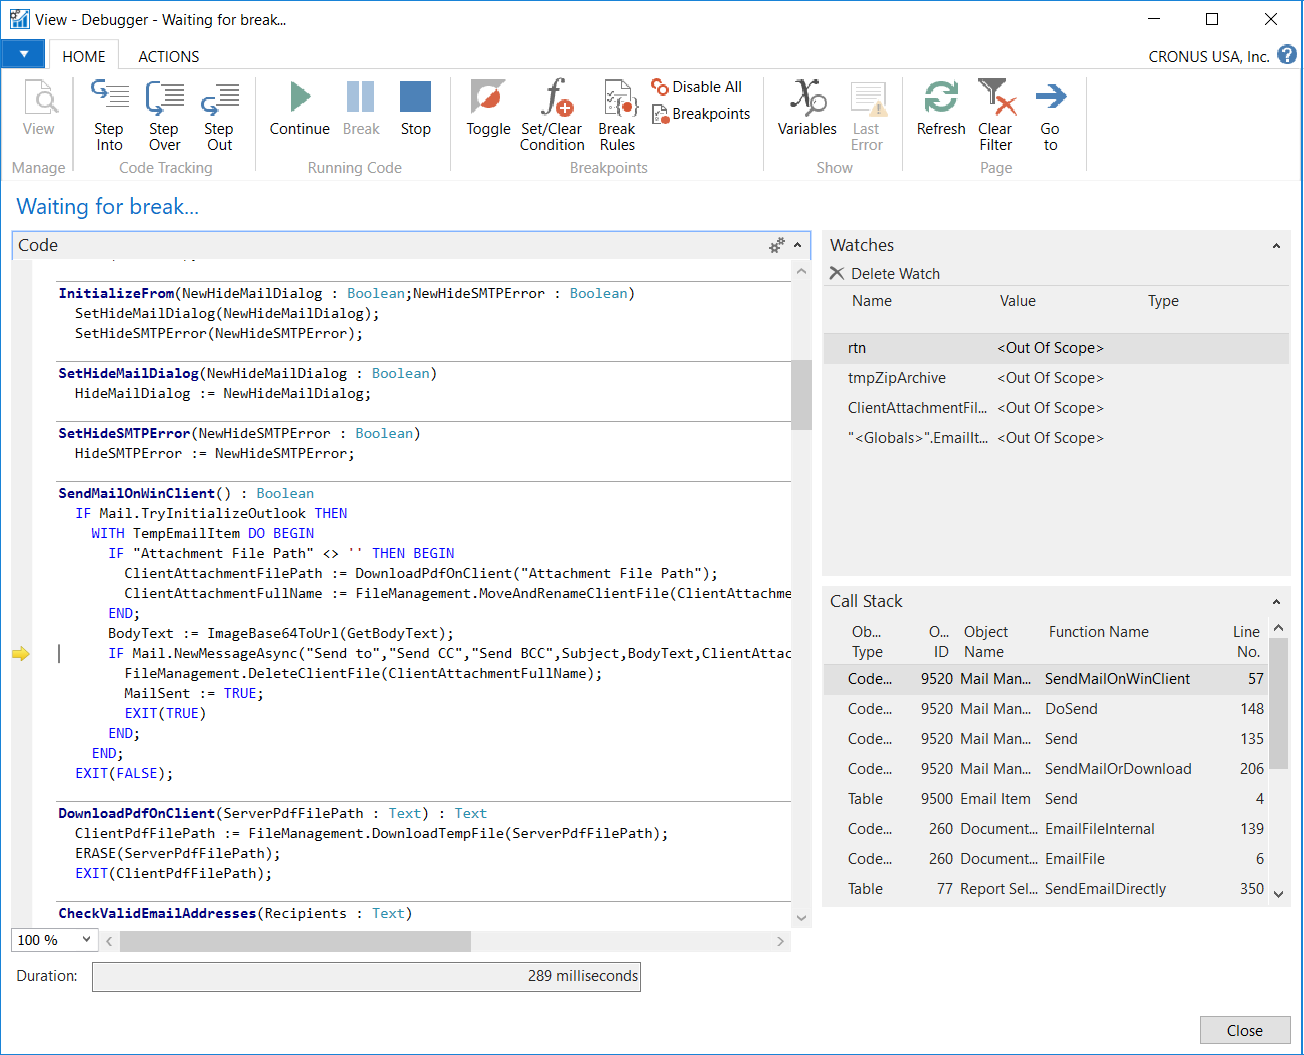
In this step, we can see where the "Attachment File Path" is being referenced again. The biggest clue here is that, right after the
Mail.NewMessageAsync(...), we can see that the attachment is no longer needed and is being deleted. This tells us we can stop at this point, because
the bug has to have happened by this point.
Zoom In
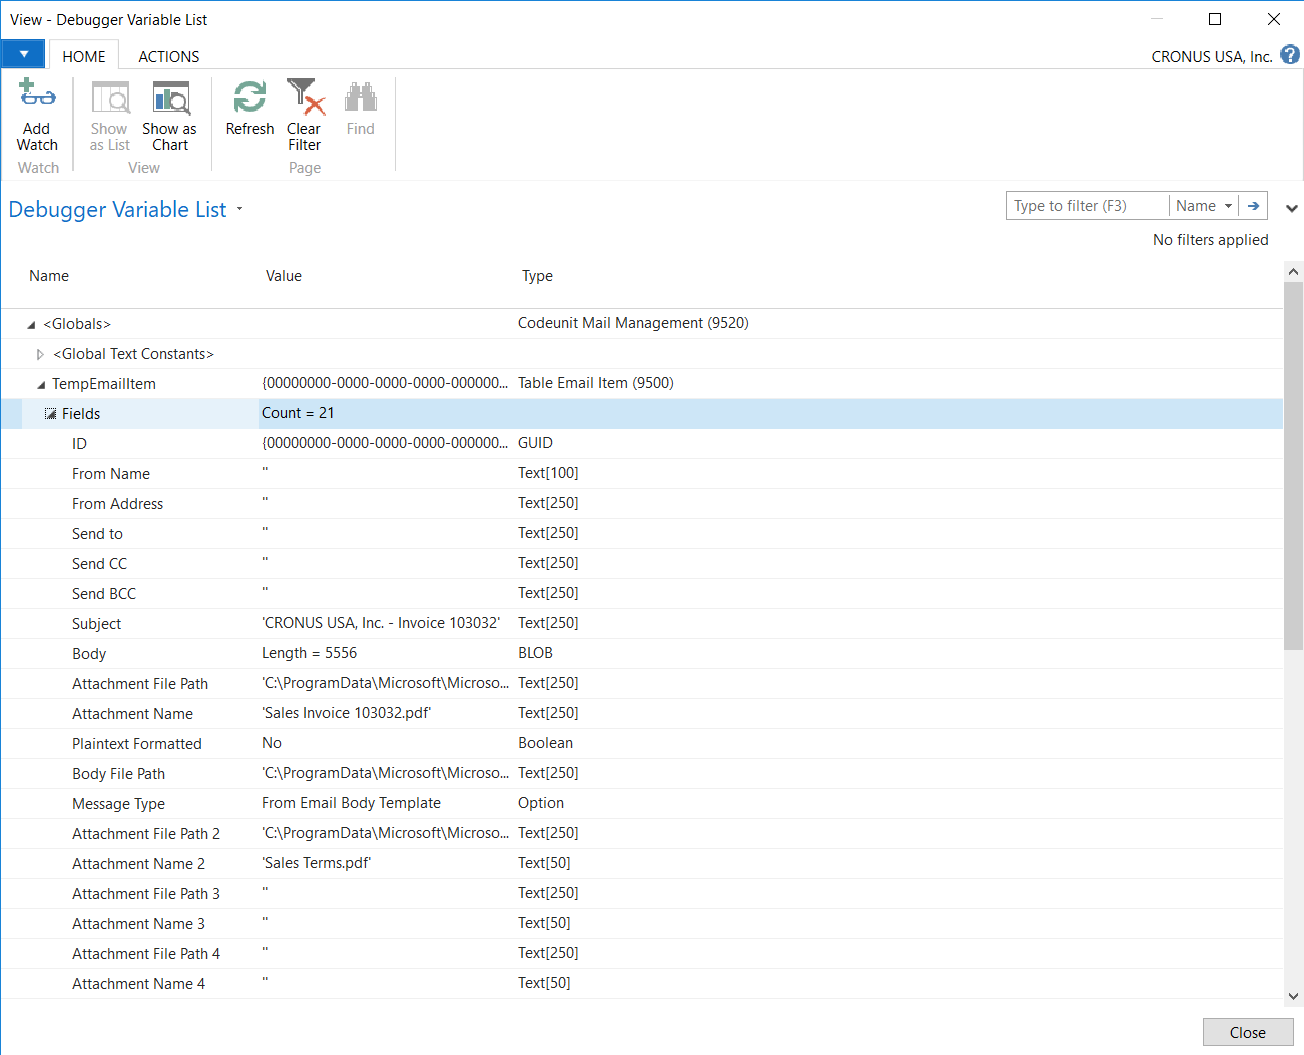
Step 9. Open the Debugger Variable List, to search for clues there.
Let's look at the TempEmailItem's fields, to see if our Incoming Document exists. As you can see, it's listed as Attachment Name 2, which tells us
that everything that's happened, up to this point, is good, because we have the attachment we're looking for.
Zoom In
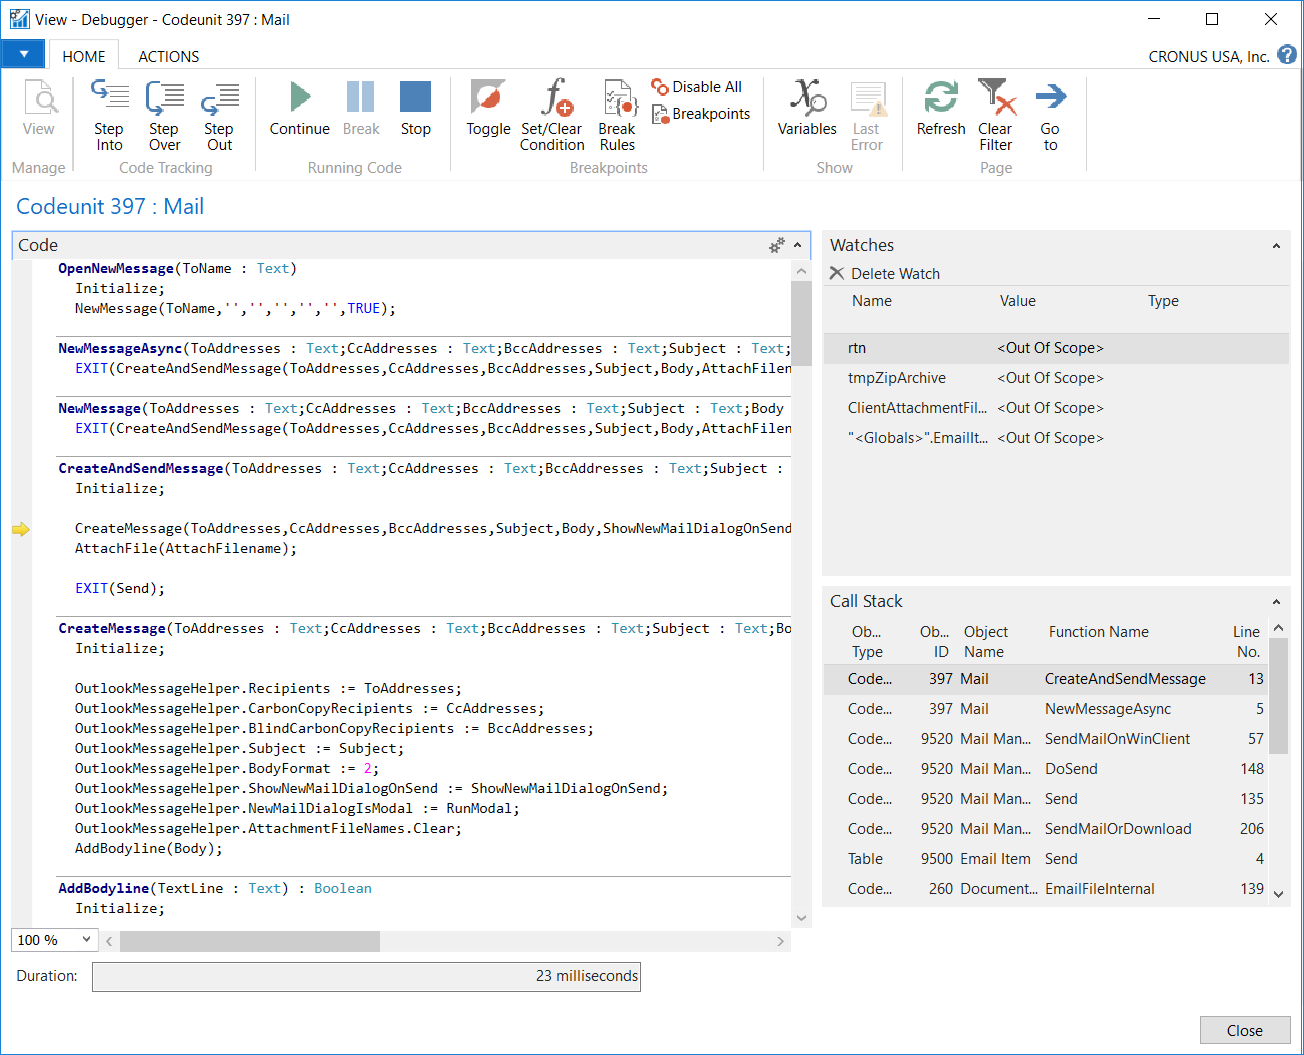
Step 10. Found the bug!
Stepping into the NewMessageAsync, we can see that it's calling the CreateAndSendMessage(...) function.
Looking at the CreateAndSendMessage(...), we can see that a message is created using the CreateMessage(...), however, there was only one
AttachFile(...) reference, before exiting with a Send.
Zoom In
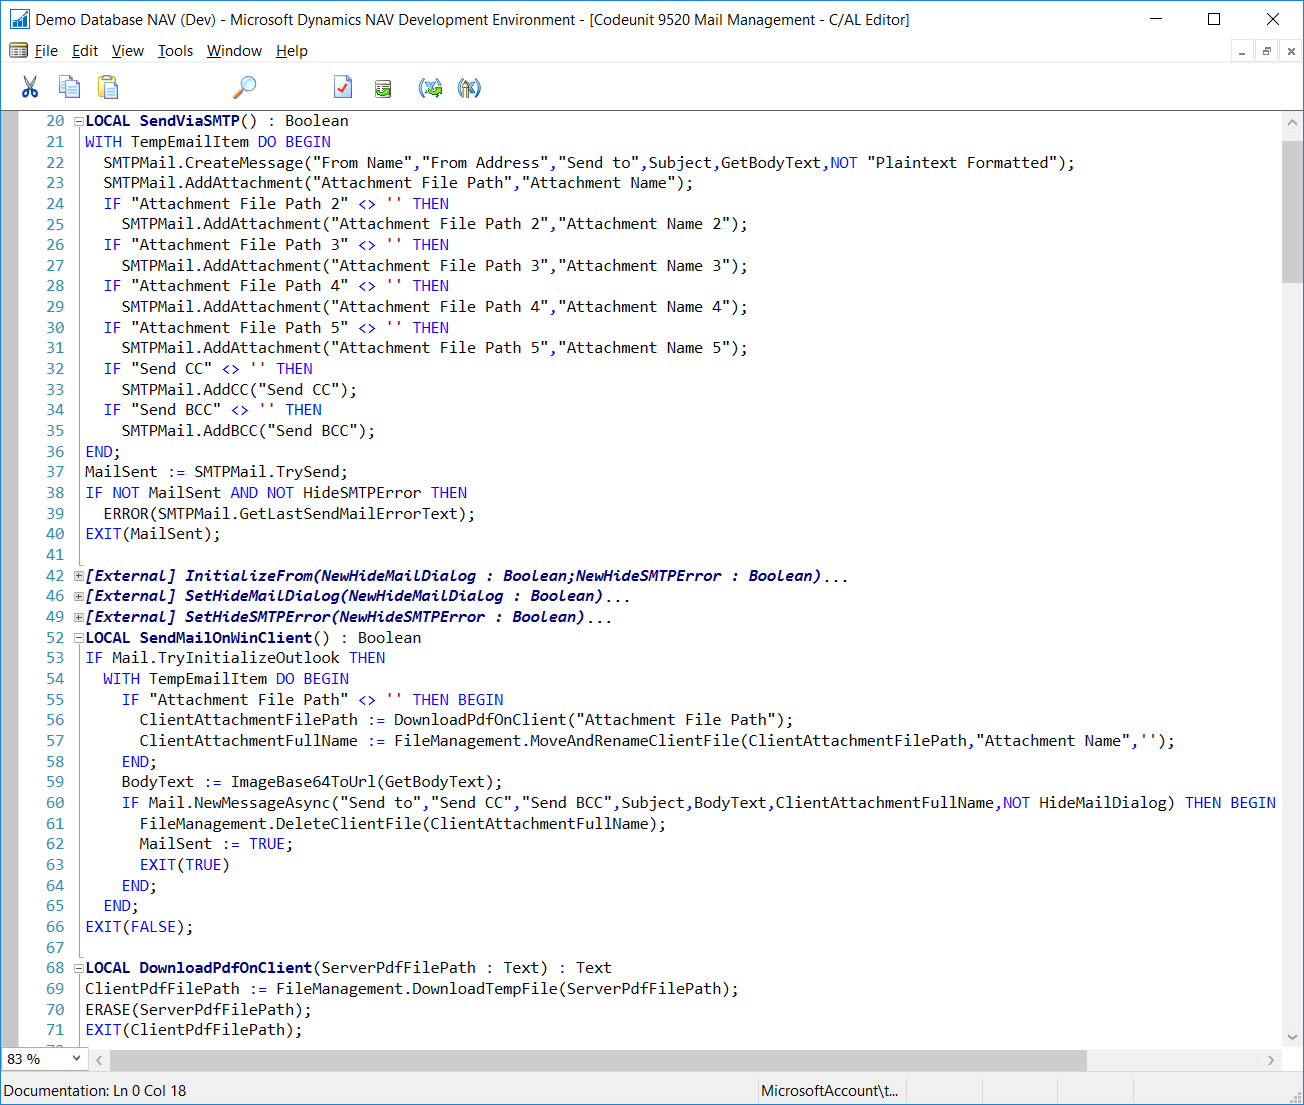
Step 11. Open the Development Environment and then Codeunit 9520 Mail Management.
If you look at line 60, you can see that only 1 file reference is being passed to the function, so how will it know what the other files are?
Obviously, it's missing these values, and this is where we'll need to fix it.
Let's decipher the code.
Take a look at line 20, SendViaSMTP. As you can see in this function, all 5 attachments are being accounted for.
Moving on to line 52, SendMailOnWinClient.
With the TempEmailItem object, it's checking to see if the "Attachment File Path" has a value, which means there's a file attached. If yes,
then download it to the client PC.
Note how it's keeping the system clean, by removing the server file after the download, in the DownloadPdfOnClient function.
As you can see, we're going to need at least 2 variables for every file, ClientAttachmentFilePath and ClientAttachmentFullName.
In case you're wondering why, it's because the client file is downloaded as a temporary file, with a random file name. When we attach the file, that's
the name that will be used and, obviously, we don't want that, so we rename it to what the original file name is, line 57.
We're only concerned about the file attachments here, so disregard the BodyText.
On line 60 is the NewMessageAsync, which has a reference for only 1 file. We'll need to fix that.
Zoom In
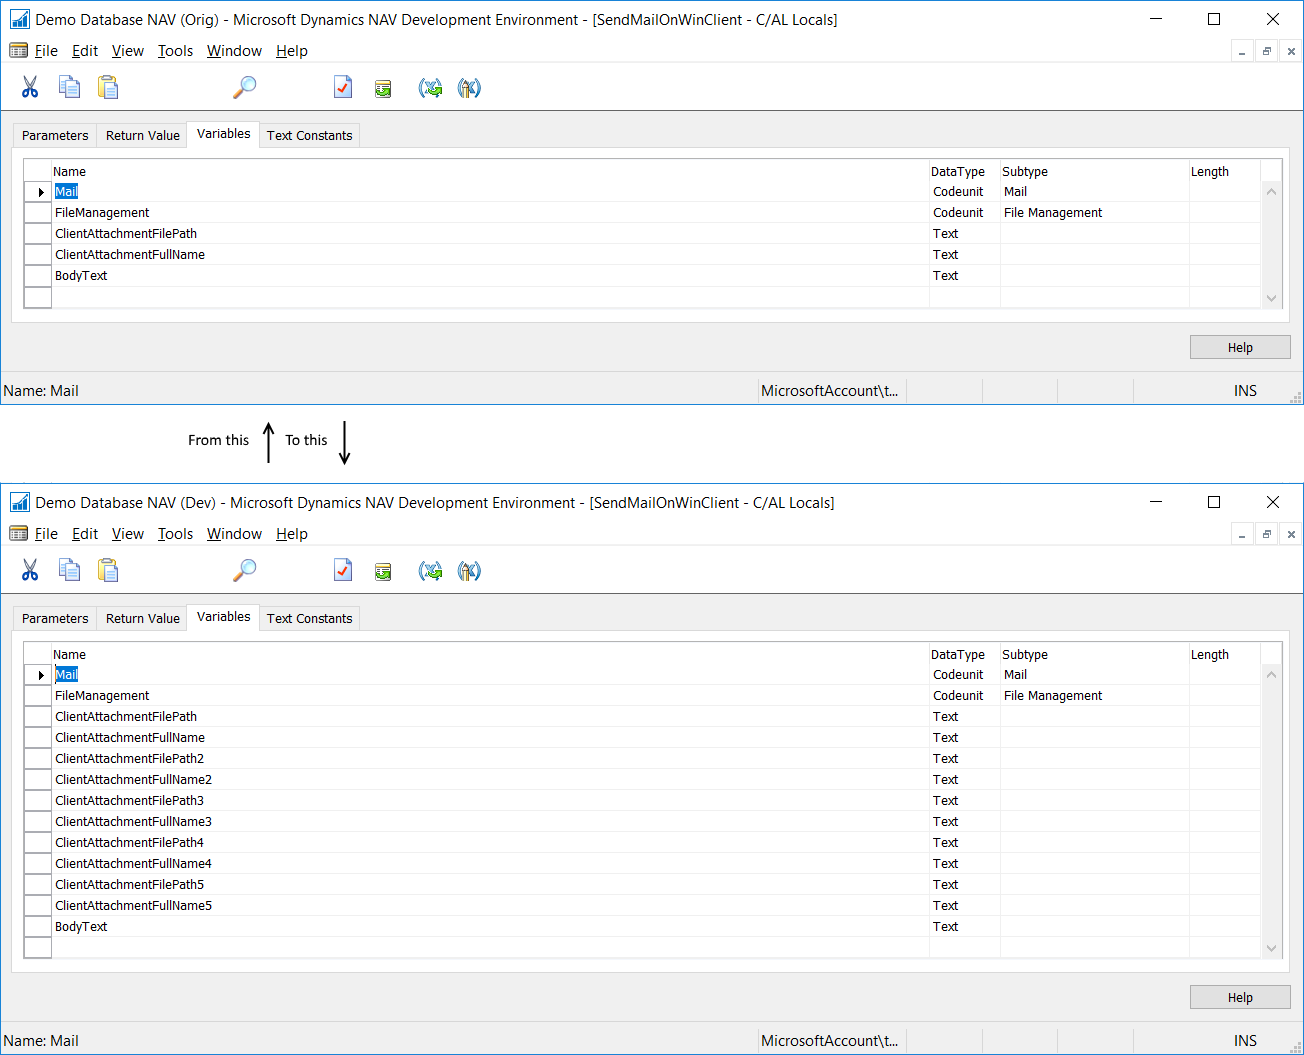
Step 12. Add the missing variables.
Open the Local Variables window and, for each file that's missing, add 2 corresponding variables.
Zoom In
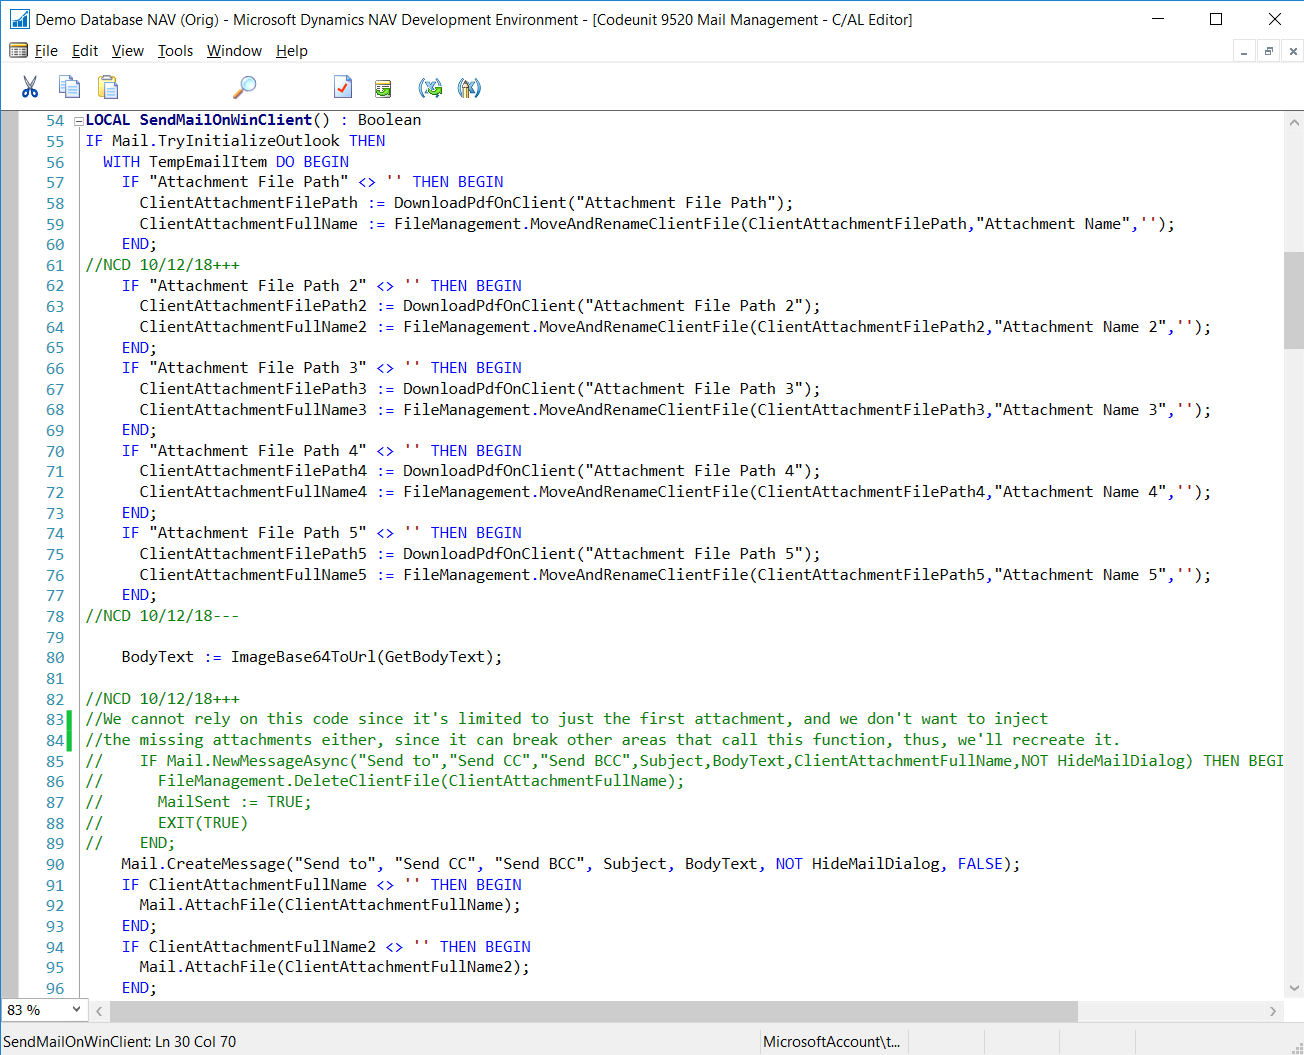
Step 13. Fixing the code.
In order to include the missing files, we'll need to inject 4 additional files into the NewMessageAsync. However, it will not be a very good idea to
do that here, since it will break other areas that call this same function. On the other hand, sometimes it may actually be a good idea to do that,
if we want to enforce the change and make sure all functions that are calling this, are taking into account the missing files, thus fixing all
probable areas. If I was the developer handling this code for NAV, that's what I would do, and recompile all codes to ensure all affected areas
are fixed. The choice you make, is entirely up to you, but for me, since I plan to freely distribute this code, as a fix to everyone, I don't want
my change to end up breaking their codes, due to the additional parameters, therefore, I opted to recreate the steps from the NewMessageAsync
function instead.
Drill down into the NewMessageAsync function.
The NewMessageAsync function is calling the CreateAndSendMessage and, in here, we can see there are just a few lines of code to replicate.
- Initialize
- CreateMessage(...)
- AttachFile(...)
- Send

Zoom In
Step 14. Applying the fix.
We'll start by adding the missing variables to the code.
Next, we recreate the steps from the NewMessageAsync function.
Note how I skipped the Initialize line. The reason is because the code is redundant and is being called in the CreateMessage, as well as the AttachFile.
Technically speaking, this is similar to what's called spaghetti code. If you step through the codes, you can see that it keeps looping back through
this function, like a spaghetti noodle. We only need to call the Initialize function once, usually at the beginning of something.
There's no reason why we should call the Initialize function in the CreateAndSendMessage, again, in the CreateMessage, and again, inside the AttachFile.
This is probably to ensure the OutlookMessageHelper has been initialized, to avoid an error, before attempting to use it. Theoretically, we should check,
but we shouldn't have to check it repeatedly like that. We should force a starting point, and not allow to continue if we fail to initialize.
Similar to how we can't attach a file without first starting a new email in Outlook, if you look at line 55, you can see that's exactly what it's doing.
If it fails to initialize Outlook, it would exit with a false.
After the message has been created, we'll check each attachment variable, and if one exists, we call the AttachFile function to add it.
Zoom In
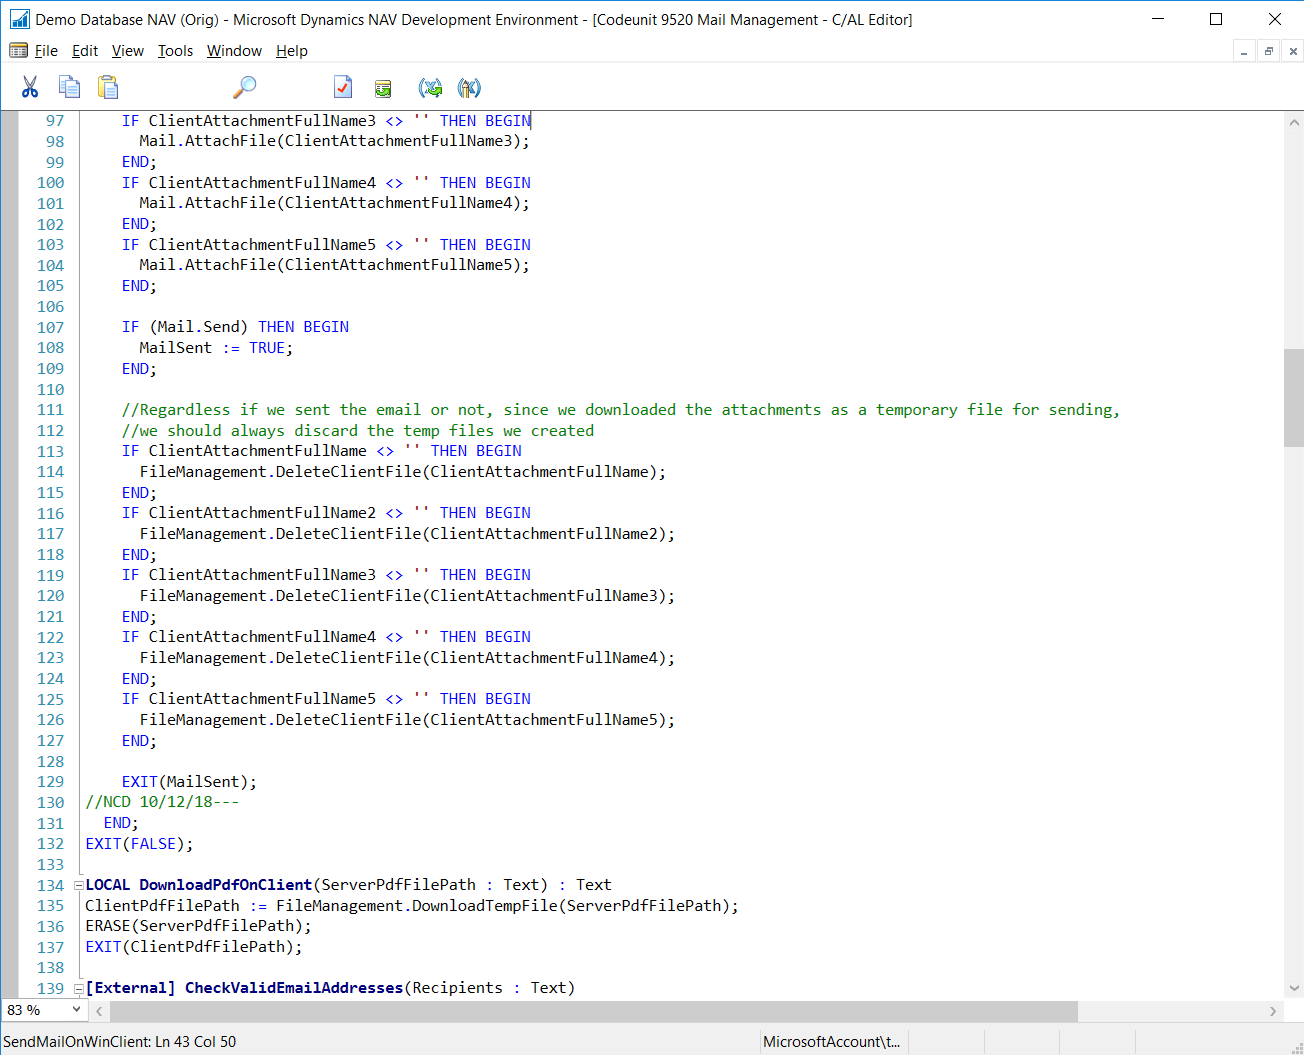
Step 15. Fixing the Clean-up.
If you look at the original code, you can see that the attachment is deleted only if it succeeds in creating a new message. However, by this point,
we already created our temporary client file (DownloadPdfOnClient), therefore, regardless if we succeed in creating a new message, we should
remove the temporary files we created.
Zoom In
Step 16. The way it should be.
After applying the fix and rerunning step 3, this is what the Outlook email should look like.
Zoom In