|
Before using the control, it must have some basic configurations setup.
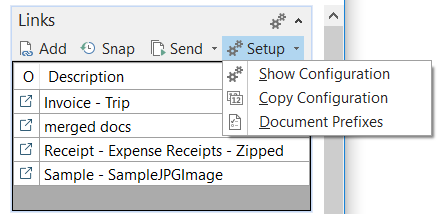
Open the configuration window by selecting the "Show Configuration" from the Setup menu on the control.
Aside from the Global Control Settings, the configuration settings are tied specifically to the page you're on.
To save time use the "Copy Configuration" option to copy applicable values from other, configured pages.
All settings from the Global and Company configuration sets, including Page Fields (if it exists), will be copied over.
|
 Zoom In
|
Configuration
|
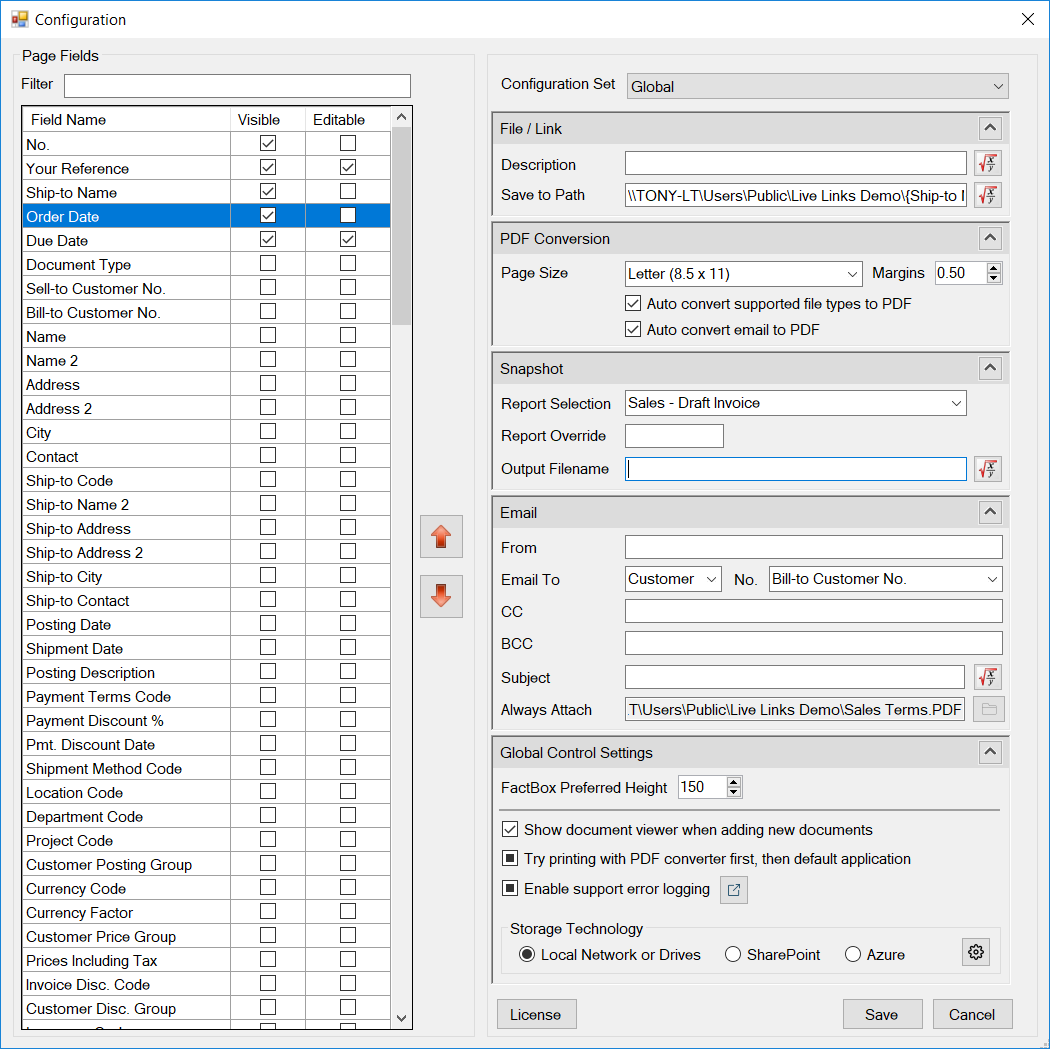
The options on this page are divided into 2 different areas, Page and Global Control Settings.
The Page Settings are further divided into 3 different Configuration Sets:
- Global
Applies to everyone and is the only set that will display all
page fields, regardless of visibility.
- Company
Applies to everyone within the company. This setting is optional
and will only display page fields that are chosen (Visible is checked) from the Global setting.
Any changes here will override the Global setting.
- User
Applies to the current user only and will override both the Global and
Company settings, however, it does have some limitations. Users cannot set or change the Save to Path
or Report Selections, these settings are derived from the Global or Company setting. Similar to the
Company, only chosen fields from the Global settings are listed under the page fields.
This section will list all the fields from the page's source table when the Global Configuration Set
is chosen, otherwise, it will only list the chosen fields from the Global Configuration Set.
Choose the fields you want to be Visible to the user when the document viewer is shown. If Editable
is checked, the user can update the field's content directly from the document viewer.
NOTE: Only the Global and Company Set can modify the Editable option.
File / Link

Description
This field is optional and by default, will use the file's name as the description but you can override
it with a value formulated from the filename, current date, and page fields that has the Visible setting checked.
Save to Path
When files are dragged and dropped onto the control, they're copied to a temporary workspace. When the document viewer is shown, you
will have the option to click Save, whereby, only the selected files are copied to this path. If the document viewer is not shown,
all files that were added will be saved to this path. If the path does not exist, it will be created.
If a file with the same name already exists in the path, the new file will have a number appended, in
numerical order, to make it unique but the description will remain the same.
For Local Networks, we recommend that you use a shared network path that all authorized users have access to.
We also recommend that you use a UNC path, such as \\shares\folder as opposed to mapped drives like
S:\folder. This will help prevent errors for users who have different drive mappings or don't have
mapped drives.
PDF Conversion
Here, you can set the default page size and margins of documents that are converted to PDF. Please note
that this does not apply to the Snapshot, which is defined in the report itself.
Page Size
Select from a list of page sizes to convert the document to.
Margins
This value is in inches and applies to all margins of the page.
Auto convert supported file types to PDF
If this option is checked, when files are dropped, the control will attempt to convert all supported file
types to PDF.
The supported file types/extensions are: DOC, DOCM, DOCX, DOT, DOTM, DOTX, EPUB, ODT, RTF, TXT, XML,
EML, MSG, HTML, XLS, XLSX, EMF, WMF, BMP, JPG, GIF, PNG, TIF, TIFF
If this option is checked, when emails from Outlook are dropped, the control will attempt to convert
the message to PDF.
NOTE: This will convert the message itself to PDF but not its attachments. If the message contain
attachments, they will be listed separately and the conversion is handled by the "file types" option.
Snapshot
This gives you the option to create a PDF report snapshot of the record for historical reference. This is
especially useful given the way records are converted from, for example, a Sales Order to a Sales
Invoice as opposed to having 2 records for checks and balance, or for historical comparison.
Report Selection
This sets the report to use when creating a snapshot. It is also used for selecting the email body, when sending emails.
If the selection has multiple report associations, it will result in multiple snapshots but a count of the snapshots will be appended
to help differentiate.
Report Override
We recommend that you use the Report Selection feature to set the report, however, if you need the Snapshot to be from a specific Report ID,
you can enter that value here and it will override the report that's defined by the selection.
The report Output Filename is an optional field that allows you to predefine a name for the output. If
this is not set, the control will attempt to give it a name based on the record's key values.
To use the snapshot feature, just click on the control's Snap menu option and the report will be
automatically generated and added as a link. You can take as many snapshots as you need.
Email
From
Optionally set the email address to use as the From address. Please note, the support for this option depends on your organization's email setup.
Email To
Choose from Customer, Vendor, or Address.
- When choosing Customer or Vendor, you'll have the option to choose the corresponding field in the
record, that points to the Customer or Vendor to retrieve the email address from.
- When choosing Address, enter a fixed email address you want the email to go to.
This is a fixed email address that's the same as the CC / BCC in an email.
Subject
By default, the page's key values will be used for the subject but you can override it with a fixed or formulated value.
Always Attach
This is an optional attachment that will always be attached to the email. It is useful for attaching terms or similar documents
to all outgoing emails.
Global Control Settings
Unlike the other settings, which is specific to each page, the settings in this area are applicable to all pages that contain
the Live Links control.
- FactBox Preferred Height
Use this setting to set the height of the control.
- Show document viewer when adding new documents
When checked, each time a document is added, the document viewer will automatically show to allow users to review, verify, and optionally
select the documents to save. This is especially useful when attaching multiple documents from zip or email attachments.
NOTE: This option is available only under the Professional and Enterprise editions.
In order to merge documents into a single PDF, this option will need to be checked.
- Try printing with PDF converter first, then default application
When checked, the control will attempt to print attachments by using the PDF converter first, if it can't then it will try using the
default application for the document type, where applicable. When using the default application to print, the application may load
and show up in the background. To improve performance, you may want to try checking this option.
NOTE: This option is available only under the Basic, Professional, and Enterprise editions.
- Enable support error logging
When checked, errors will be logged to a text file that can be easily forwarded to your internal IT Support department or NAVCore's
Help Desk for resolution. Regardless if checked or not, errors are always logged under the Windows Event Logs.
Storage Technology
- Local Network or Drives
Save files to the local network drives. This option requires that the user must have read/write access to
the network path or read-only access if using the server context to save files, which means the account that
the NAV Service Tier uses must have read/write access to the network path.
- SharePoint
Save files to SharePoint using a secure username and password. With this option, the NAV user doesn't necessarily
need read nor write access, unless they want to open the link directly. The built-in document viewer will provide the mechanism
needed for accessing the document.
- Azure
Save files to Azure File Service folders using a connection string, which provides all the necessary information.
With this option, the NAV user doesn't necessarily need read nor write access, unless they want to open the link directly.
The built-in document viewer will provide the mechanism needed for accessing the document.
NOTE: The document viewer is available only under the Professional and Enterprise editions.
|
 Zoom In
|
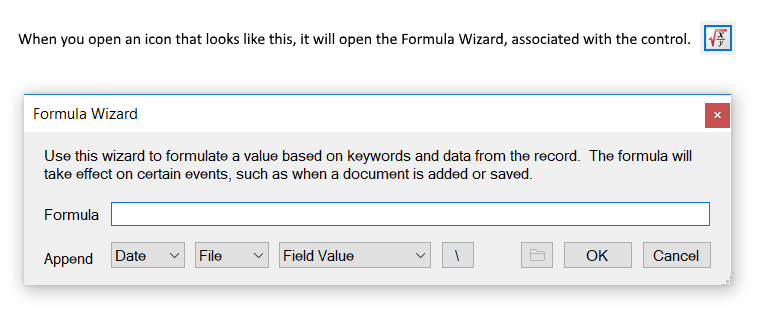
Use the Formula Wizard to formulate a value for the associated text box.
Choose from the following options
- Date
Use this to add the current date. If you don't see the format that you
need, then choose individual formats to combine and create the equivalent.
- File
Use this to add values related to the file, such as filename, extension,
counts, etc.
- Field Value
Use this to add values from existing fields on the record.
Note: This list is drawn from the Page Fields that has the Visible option checked.
The folder icon is visible only when applicable.
|
 Zoom In
|
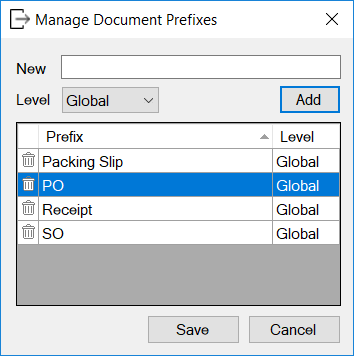
Document Prefixes
Use the Document Prefixes to help determine file contents without having to open it. It can also be
used for automatically selecting files during the Export and Printing process.
You can set the document prefix either from the document viewer or from the Set Document Prefix, context menu. When chosen, it will
merely add a prefix, using the values you've defined, to the document's description field.
You can manage the document prefixes by choosing the "Document Prefixes" menu option from the Setup menu.
Choose from the following Levels
-
Global
Available to everyone.
-
Company
Available to everyone within the company only.
|
 Zoom In
|
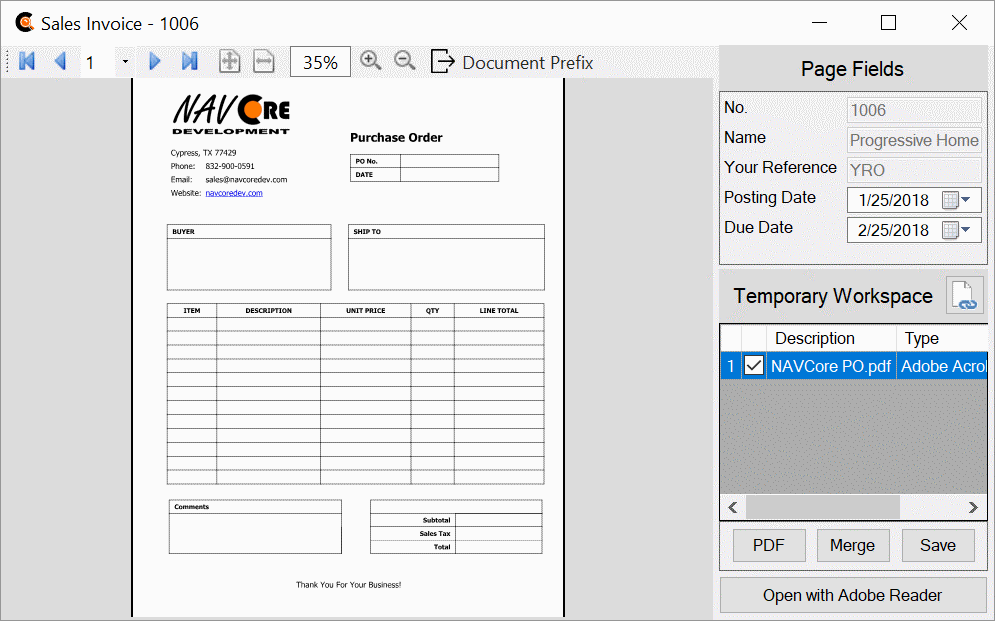
Document Viewer
|
|
The Live Links control comes with a built-in viewer that supports many popular document types. If the file type is supported, the
viewer will load and display it. Depending on the storage technology setting, when the Local Network or Drives is chosen, the files
will be loaded directly from the path, else, the files will be downloaded to a temporary folder for the viewer to access and discarded
when the viewer is closed.
Note: The document viewer will display only for the Professional or Enterprise editions.
Adding Documents
There are two ways you can add documents to the control.
#1 Drag and drop a file from File Explorer or Outlook onto any area of the control or the viewer,
when it's being displayed.
#2 Click on the Add menu option, browse for and select the file.
Page Fields
This area will list the fields that were selected from the configuration. Based on the Editable
checkbox, users may or may not be able to edit the field's content. In addition, the page must support
the Edit option. The ability to set page field values directly from the viewer is especially
useful for recording external document numbers, information, etc., while viewing the document.
Temporary Workspace
Files that are initially added or dropped onto the control are copied to a temporary workspace for
you to review prior to accepting. If you need to edit the document, click on the open with
button to open it in the default application used by your device. After making and saving
your changes, close the application, switch back to the viewer and click the Reload Document
button, which replaced the Open with button, and your document will be reloaded for your review.
You do not have to worry about the originals since you're working with a temporary copy.
You can convert documents to PDF by clicking on the PDF button. All the checked documents
will be converted, if the document type is supported.
You can also merge the documents into a single PDF. Each document that is checked will be given
a number. The documents will be merged in this order, if needed, you can change the order
by directly modifying this value. The documents do not need to be in PDF format in order to
merge, however, conversion must be supported for the document type.
All documents that are in the temporary workspace will be checked by default. Review each
document as needed and uncheck items you do not wish to keep. Once you are satisfied,
click on the Save button and each checked item will be copied to the folder defined by the
"Save to Path" under the page's configuration and a link to the item will be created under
the Links list. Items that are not checked will be discarded.
|
 Zoom In
|
|
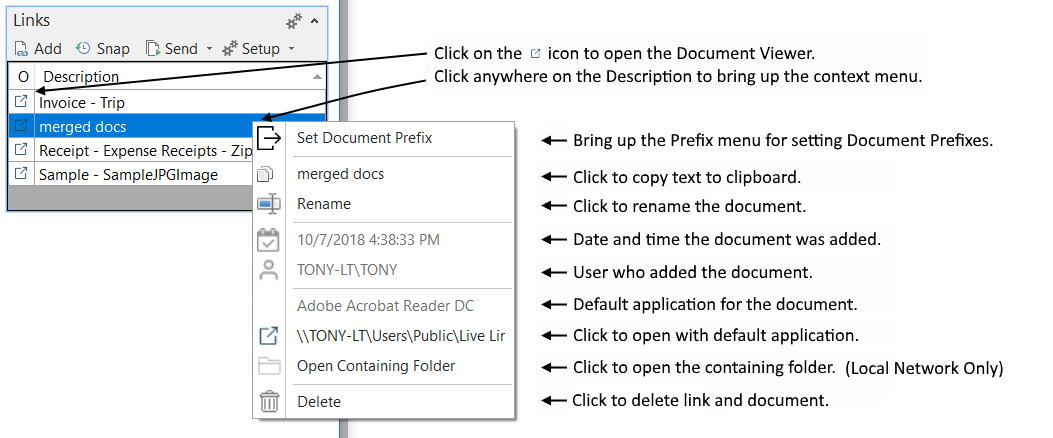
Instead of having to scroll back and forth to see related information about the document, which you may
not always need, we chose to leave those information under a context menu instead. This way, we can give
you more information about the document, without cluttering your display. This also gave us the ability
to pack even more functionality for managing or working with the documents.
The context menu gives you all related information about the document and additional actions. Click
anywhere on the description to bring up the menu. Each menu item performs a specific action, grayed-out
text are informational only.
|
 Zoom In
|
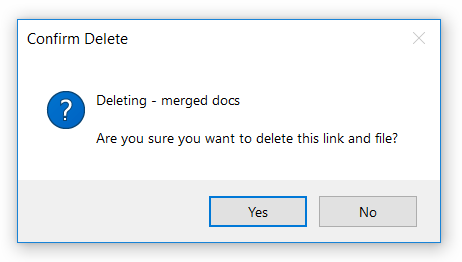
Deleting a Link
Unlike the standard link deletion operation, which only deletes the link, this operation will also delete
the corresponding file, to keep your files and links in sync. In addition, only the original user who added
the document or users with the "NAVCORE-USER-ADV" permission set, may delete the link, which provides an
extra level of security to protect documents from being accidentally deleted by novice users.
|
 Zoom In
|
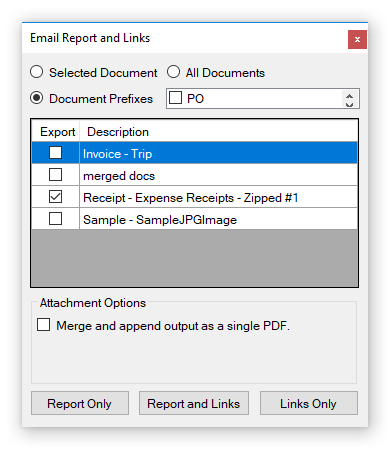
Emailing
Email reports as PDF, including linked documents.
NOTE: NAV 2016 and 2017 can only attach 1 document at a time. When more than 1 document exists, the files
will be merged into a single ZIP file, for emailing.
NAV 2018: This version supports attaching up to 5 documents. When more than 5 document exists, the files
will be merged into a single ZIP file, for emailing. Please note, as of this writing, there's also a bug, that will allow sending
up to 5 documents when sending via SMTP but not when sending via Outlook. Please see our tutorial on how to fix this bug, or
download the fix in the form of a fob file. Customers who do not have the object modification license should download the fob file instead.
- Selected Document
When this option is chosen, the document that's currently selected in the parent page will be selected.
- All Documents
When this option is chosen, the listed documents will be selected.
- Document Prefixes
When this option is chosen, only the documents that have the corresponding document prefix, that's checked, will be selected.
- Merge and append output as a single PDF.
When checked, all outputs will be merged into a single PDF (if document format is supported), before being attached to the email.
This option is especially useful for NAV 2016 and 2017, where only 1 attachment per email is supported.
- Report Only
Visible only when there's a report association. Click this to email the report only.
- Report and Links
Visible only when there's a report association. Click this to email the report and the selected links.
- Links Only
Click this to email the selected links only.
|
 Zoom In
|
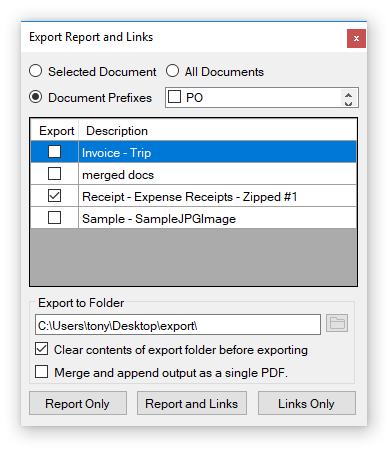
Exporting
Export reports directly to PDF, including linked documents to a folder you specify. Automatically choose documents by the
Document Prefixes or All Documents. Your choices will be remembered the next time you export.
- Clear contents of export folder before exporting
As the setting implies, when exporting and this option is checked, the contents of the chosen folder will be deleted,
therefore, you must be extra careful in choosing your export folder.
- Merge and append exported links
When checked, everything that gets exported will be merged into a single PDF output. Depending on the options chosen,
the order in which the output is merged is report then links, in no particular order.
- Report Only
Visible only when there's a report association. Click this to export the report only.
- Report and Links
Visible only when there's a report association. Click this to export the report and the selected links.
- Links Only
Click this to export the selected links only.
|
 Zoom In
|
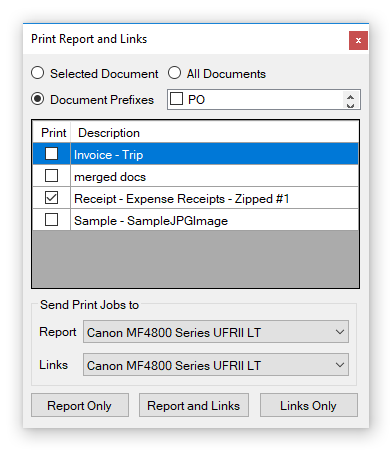
Printing
Send reports and linked documents to the same or different printers at the same time. Automatically choose documents by the
Document Prefixes or All Documents. Your choices will be remembered the next time you print.
Do you have a need to print reports, such as Invoices, on colored paper, and attachments or supporting documents on white papers?
If so, you can take advantage of this control's unique dual printing feature to print everything at once. Even better,
if you have a printer that supports printing from multiple trays, then setup 2 separate printers on your computer, pointing to the
same printer, but each with its own preference. Set 1 to print from the manual feed tray and load the specific color paper in that tray.
Set the other to print from the automatic feed tray and load the other color papers. Specify which printer the report should print to
and which the Links (Documents) should print to. When you print from this control, while everything is being sent to the same printer,
because of the difference in preference, you can now print everything on the same printer but with different color paper outputs.
- Report Only
Visible only when there's a report association. Click this to print the report only.
- Report and Links
Visible only when there's a report association. Click this to print the report and the selected links.
- Links Only
Click this to print the selected links only.
|
 Zoom In
|
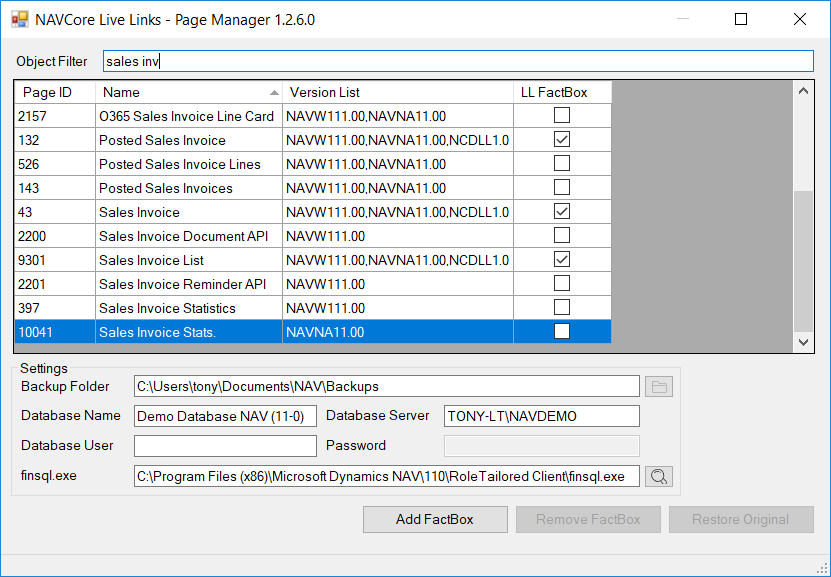
Page Manager
Use this tool to easily add or remove the add-in from pages in NAV. To run, simply run the "NAVCore Live
Links FactBox" page directly from the NAV Development Environment. When the page runs, you'll be presented
with a Live Links button. Click on the button to open this tool.
Settings
- Backup Folder
For your protection, choose a secure folder where the object can be exported and saved,
in case you ever need to restore it to its original state.
-
Database Name
This value is automatically populated based on the database that's opened by the
development environment.
-
Database Server
To obtain this value, go to the development environment and choose the menu option
File > Database > Information.
-
finsql.exe
This is the NAV Development environment executable. This is needed for exporting and importing the
object after it's been modified.
Integration
-
Add FactBox
Click this button to add the add-in to the selected page.
Note:This operation will generate a text export of the selected page under the Backup Folder.
-
Remove FactBox
Click this button to remove the add-in from the selected page.
Note: This will remove the add-in but leave other modifications intact. Use this option if you've
made modifications to the page after the add-in has been added, in order to retain your modifications.
-
Restore Original
Click this button to restore the page to its original form.
Note: This relies on the export generated by the Add FactBox function, therefore, it's available
only if the function was used when adding the add-in and the original backup file exists.
Important: This operation cannot be undone. Only use it if you're absolutely certain there were
no modifications after the FactBox was added.
|
 Zoom In
|
Installation
Installation Steps
-
Step 1. Download the Control Add-in Objects
Download the edition that matches your NAV version, and the Object ID range that's not being used in your system. Please select only 1
Object ID range; it must be the same for the Table, Page, and Report.
-
Step 2. Importing NAVCore Objects
Run the NAV Development Environment and initiate an Import.
IMPORTANT: Never delete existing objects. If upgrading, when prompted, use the default option chosen by NAV, which is to
merge with the existing Table while replacing the Page and Report objects.
-
Step 3. Run the NAVCore Live Links Install to add the Control Add-in into NAV.
NOTE: The FactBox page must be in compiled state before you can run it. If not, you must manually
copy the contents of the installation zip file to the proper Add-in folder before you can compile
and run it. The table and report object does not require the zip contents but will need to be
in compiled state before you can run it.
When prompted, click Yes.
Browse to and select the NAVCoreLiveLinks.zip file.
If installation succeeds, you should see this.
-
Step 4. Run the NAVCore Live Links FactBox.
The first time you run this, NAV will look for the Control Add-in objects on the client PC
and if it doesn't find it, NAV will copy the contents of the NAVCoreLiveLinks.zip to the appropriate folder.
If everything succeeds, you should see this, which indicates the control was successfully installed.
Click the Live Links button to open the Page Manager. Add the control to the pages you desire.
|